There's an easier way to reorder bullet points in Google Docs than cutting and pasting! - Position the insertion point over the bullet point line you want to move.
- Press Ctrl+Shift+⬆ (up arrow) to move the line up, or Ctrl+Shift+⬇ (down arrow) to move the line down.
I’ve found that this works a lot more nicely than cutting the item to be
moved, and then pasting the item in the new location in the list (since
often, line breaks need to be fixed up after the new item is pasted
in).
If you select multiple items in the bulleted list first, then the aforementioned keyboard shortcuts will move them all together, as a group. This tip works for reordering or moving regular paragraphs, too, in addition to bullet points. Want to do the same thing in Microsoft Word? Check out my (much!) earlier post, Tip: How to easily reorder bullet points in MS Word, from 2009!
Here's a quick workaround for when you pull up a Trello card with the intention of clicking through to the linked GitHub pull request, but the "GitHub Pull Requests" section of the card stubbornly just displays "Loading...", without ever resolving to the link you're after. (This situation is likely related to a number of HTTP 500 error responses from requests to api.github.com visible in the Network tab of the browser's developer tools.)
Scroll down to the Activity section of the card, and look for the events with the "attached" verb. One of them should include the GitHub PR link.
If you know your GitHub repository's name, you can do a Ctrl+F/⌘+F search for that. The word "GitHub" doesn't actually appear in the text of the activity log item, but the repo name does.
On my development machine, I have an external monitor physically set up in vertical / portrait orientation, instead of the “default” horizontal / landscape orientation. My IDE (code editor) window always resides on that monitor. Instead of writing 1000 words to explain why this works great, I’ll let a pair of pictures do most of the explaining for me. Here’s a Visual Studio window (with the code for my open-source “Schneider’s Eleven” minimalist skin for Windows Media Player) open on my horizontal-orientation monitor at 1920x1080 resolution: 
Look at all that wasted whitespace on the right half of the main code pane! (This code was admittedly developed using fairly short line lengths, but the same wasted space effect probably still applies to at least some extent in the majority of projects out there.) Now, here’s the exact same Visual Studio window moved over to my vertical-orientation 1200x1920 monitor: 
Much less wasted whitespace! And almost 100 lines of code are visible on the screen at the same time, making it much easier to visually scan a large chunk of source code without having to scroll around. Having developed code this way in both Windows and Mac OS environments, I’d never go back! Rotating a particular monitor 90 degrees is an easy configuration change in the OS display properties (in Windows, Mac OS, and evidently in Linux as well), so if your physical display stand supports it, I’d encourage giving it a try and seeing how it works for you!
Here are a couple brief email tips that are top of mind: Set Recipients Last! When writing a long email message, leave the To (Recipients) field BLANK until last, so that if you inadvertently hit Send before the message is actually finished and ready to go, it won't go anywhere! Attach Attachments First! As soon as you type the words “see attachment” or “please find attached” into the message body, stop typing, and add the actual attachment to the email! If you assume you’ll remember to add the attachment after you’ve finished typing up the message body, sometimes you won’t remember!
Here’s a quick tip on selecting text with the mouse that I’m blogging as much to help myself remember as to inform you, the reader: You can double-click-drag – that is, double-click, and continue holding the mouse button on the 2nd click – to select multiple entire words from a block of text. This obviates the need to position the mouse cursor exactly over the small space between words when selecting entire words or sentences, both when beginning and ending the selection. Bonus tip: You can triple-click to select an entire line or paragraph of text. (This one I do remember and use frequently – and get annoyed by those few applications that don’t support it.) These tips work in most applications on both Windows and Mac.
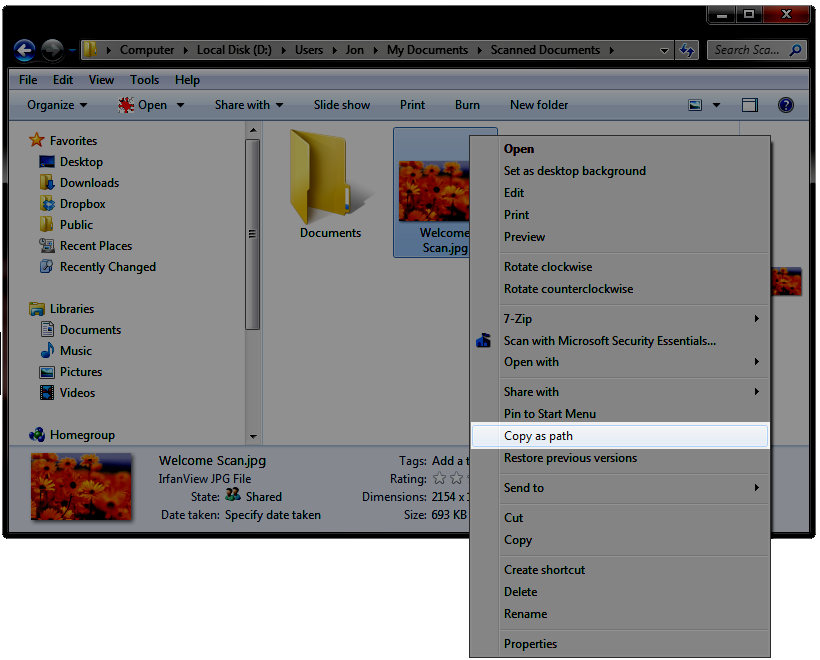
In Windows 7, if you ever have a file open in Windows Explorer that you know you’ll want to manipulate in another application, such as attaching the file to an email (or embedding an image in a blog post!), a quick way to copy the file’s fully-specified path and filename to the clipboard is to hold Shift and right-click the file, and select the Copy As Path option. 
Then, you can just press Ctrl+V to paste the path into the Open File… dialog of the target application! No need to drill down through your filesystem’s folder structure to find the file. It’s nice that this is included as native functionality in Windows 7. In Windows XP, it was necessary to use a 3rd-party utility such as ClipPath to get this same functionality.
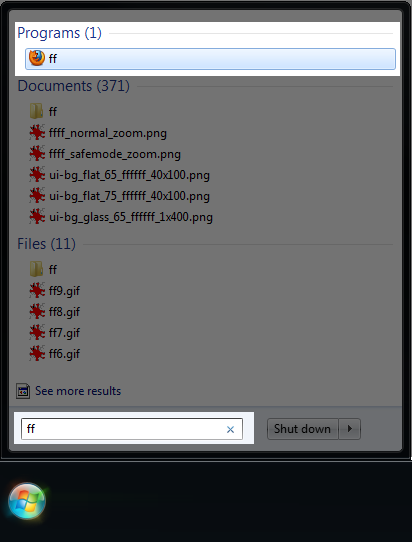
This article describes a way to configure Windows 7 to launch applications and websites from the “Search programs and files” field in the Windows 7 Start menu using custom-defined shortcut keywords – without using the mouse at all. This is similar to the functionality of 3rd-party utilities such as Slickrun, Launchy, and Quicksilver, but with this method, no 3rd-party software is required! As an example, this technique could be used to set up the keyword “ff” as a shortcut for launching the Firefox browser. You would be able to launch Firefox from anywhere in Windows simply by typing the following four keystrokes: [Windows Key]
ff
[Enter] Doing this would bring up the Windows start menu and enter “ff” into the “Search programs and files” field; after having followed the steps detailed in the remainder of this post, Windows will recognize “ff” as a “Program”, and therefore will give it the focus automatically; you can then just press Enter to launch “ff”, which is configured as a shortcut for launching Firefox. This is shown in the highlighted portions of this screen capture of the Windows 7 Start menu: 
Step 1. Create a “Shortcuts” folder Create a new folder named Shortcuts at location: %appdata%\Roaming\Microsoft\Windows\Start Menu\Programs\ The folder doesn’t have to be named Shortcuts; you can use something else if you like. Note that because this folder is created under the Start Menu\Programs folder, this new folder and its contents will show up as a folder on your Start menu. Why does the folder need to be created at this location? This needs to be done so that Windows will recognize shortcut files placed in that folder as “Programs” when the shortcut filename is keyed in to the “Search programs and files” field on the Start menu. Step 2. Create a shortcut to the new Shortcuts folder This step is optional, but to make things easier, I suggest that the first new shortcut you create is a shortcut to bring up the Shortcuts folder itself in a new Windows Explorer window. One way to do this is to manually open up an Explorer window (Shortcut key: [Windows Key] + e) and enter in that window’s address bar: %appdata%\Roaming\Microsoft\Windows\Start Menu\Programs\Shortcuts Then, drag the yellow folder icon from the left side of the address bar into the main area of the window to create a shortcut to that folder. Finally, rename the shortcut (Shortcut key: [F2]) from Shortcuts – Shortcut to just shortcuts. Once this is done, you can test the new shortcut by pressing [Windows Key] to open up the Start menu, typing in “shortcuts”, and pressing [Enter]. A new Windows Explorer window should open, showing the Shortcuts folder. Step 3. Create Application Shortcuts Now you’re ready to create some shortcuts to run applications! To create a named shortcut to launch a particular application, just create a shortcut to that application in the Shortcuts folder you created, and name the shortcut file to whatever you want the keyword to launch the application to be. Then, to test the shortcut, press [Windows Key], key in the shortcut name, and press [Enter]. One easy way to create a shortcut to a particular program is to use the right mouse button to drag and drop that program’s entry from the Start menu to a Windows Explorer window that’s open to the Shortcuts folder. After dropping the item, select “Create Shortcuts Here” from the context menu that appears. After keying in the shortcut name (and before pressing enter), you should see your custom shortcut appear immediately as the first item in the list of real-time search results that Windows generates under the “Programs” heading. Since Windows considers the shortcut to be a “Program,” pressing enter causes Windows to run that program without you even needing to arrow key down to that search result in the Start menu – Windows selects it for you by default. Nice! One caveat: For me, for certain single-character shortcuts (such as “g”, but not “n”), Windows doesn’t recognize the shortcut file as a “Program” in the start menu. If a given single-character shortcut doesn’t work for you, I’d suggest trying a two (or more) character shortcut keyword instead; all two-or-more-character shortcut keywords that I’ve tried have worked for me. To give you some ideas on getting started with creating your own shortcuts, here are just a few of the shortcuts that I currently have set up on my local PC: These shortcuts even work with parameters, for example, with my configured “timer” shortcut, I can key in “timer 5m” to start Orzeszek Timer running with a 5-minute timer. Step 4. Create Website Shortcuts You can also set up shortcuts to launch a particular website in your default web browser. To do this, just create a new shortcut from Windows Explorer in your Shortcuts folder (right-click | New | Shortcut), and in the item location field, paste the URL of the target website (such as “http://blog.jonschneider.com”, without the quotes). Then, name the new shortcut with the keyword you’d like to type to launch that website, and that’s it! Open Question: Websites with Parameters One thing I have not yet figured out how to do using this technique is to elegantly set up a shortcut to launch a website with a particular parameter. For example, I’d like to be able to key in “g search terms” to bring up Google in a new tab and the default browser, and run a search for search terms. That is, a new browser tab would be opened with the url http://www.google.com/search?q=search term. If anyone knows of an elegant way to do this (without resorting to the use of a 3rd-party background program like Slickrun), please leave a comment and let me know!
At work, I have a particular folder on my Windows PC that I access many times per day to open and save various documents for the project that I’m working on. I have two conflicting needs for where in the filesystem that folder should be located": - C:\. As I prefer using the keyboard to the mouse for quick and easy tasks, the ideal location for this folder is directly off the root directory of the C: drive. It’s pretty easy to type, for example, “c:\proj\todo.txt” into an application’s Open dialog, or from the command prompt. I can do that more quickly than switching to the mouse, clicking “My Computer”, double-clicking “C:”, double-clicking the “proj” folder, scrolling “todo.txt” into view, and then double-clicking on that file.
- My Documents. My office’s automated backup policy only picks up documents that are located under the “My Documents” folder. While I could locate my “proj” folder under My Documents rather than under the C:\ root directory, typing “c:\documents and settings\jschneid\my documents\proj” 30 times a day rather than just “c:\proj” obviously becomes very inefficient very quickly.
So, to summarize the problem: I want my use-it-all-the-time “proj” folder to be at “c:\proj”, but I needed it to be under “My Documents” in order for it to be picked up by my office’s backup scheme. The solution: The Junction utility, part of Microsoft’s Sysinternals suite of tools. The Junction utility allows the creation of a folder at a particular location in the filesystem which is really a symbolic link (shortcut) to another folder, which the command prompt and Windows Explorer respect. In my case, I created my “proj” folder under My Documents (so it would be picked up by my office’s backup process). Then, I used Junction to create a symbolic link to that folder at “c:\proj” for easy access to that folder via the keyboard. This solution has worked out great for me. I type “c:\proj” many times every day – saving a couple of seconds over using the mouse to access that folder every time. I wanted to share this tip for anyone else out there who might be able to benefit from having an easy-to-access shortcut to a deeply-nested folder on their filesystem – and for those that might not have been aware that it’s possible to set up Unix-style folder symbolic links on Windows.
I have a 15-minute commute by car to work – so that’s about 2.5 hours I spend in the car going to and from work on a typical week. Occasionally I listen to music in the car, but most often I prefer listening to talk. Historically, I would typically listen to AM radio on the commute: sports, news, or just whatever was on any station I could find that wasn’t on commercial. For the past couple of years, though, I’ve listened to podcasts on the commute instead. For anyone unfamiliar with the term, a typical podcast is essentially a talk radio show that you can download online for free, and listen to on an mp3 player. Listening to podcasts have several significant advantages over AM radio: - Choice of Topic. At any given time, there are only a few topics available to listen to on talk radio shows. By contrast, there are a podcasts on a multitude of topics available for free download online. I’ve replaced listening to general news and sports talk on my commute with topics that are specifically of interest to me, like software engineering, Christian apologetics, and video games.
- On-Demand / Pauseable. With a podcast, the show starts exactly when I sit down in my car in the morning. And when there’s something interesting being discussed as I arrive at work, instead of missing the end of the discussion, I can just pause my mp3 player, and pick up the show right where I left off when I begin my commute home in the afternoon.
- Limited or No Commercials. Whereas a typical radio station plays commercials as much as 15% of the time or more, many podcasts are produced on a volunteer basis and are totally commercial-free. In my experience, in those podcasts that do run ads, the ads are fairly limited. And as a last resort, you can always skip past any particularly intrusive commercials that do happen to be present using the fast-forward function on your mp3 player!
My current mp3 player is an Apple iPod, so I use Apple’s iTunes software to subscribe to podcasts, and have the latest episodes automatically download to my PC. Then, when I sync my iPod with my PC (which I typically do once a week or so), I get several new episodes of my favorite podcasts to listen to on my commute over the next several days. Easy! (If you don’t have an iPod, there are several free RSS software packages out there that support audio files that you can use to subscribe to podcasts, and have the .mp3 files automatically download for you.) The only remaining challenge, then, is how to get the mp3 player output to play through the car speakers (since it’s for obvious reasons dangerous, and apparently in many places illegal, to drive while wearing headphones). With an older car, you can get an inexpensive device that converts an audio cassette player into a line-in jack for an mp3 player. Many newer cars these days come with a line-in jack built directly into the stereo system. However, I drive a model year 2005 car that has neither a line-in jack nor a cassette player. The solution I landed on for listening to my iPod in my car was a Griffin iTrip FM Transmitter / Charger. The device is essentially a short-range FM transmitter does a a short-range FM radio broadcast of whatever is playing on your iPod, using an FM frequency that is unused in your area (a frequency that you specify). Then, you just tune your car radio to that same FM frequency, and you can hear your iPod podcast (or music) over your car’s stereo system! I’ve actually bought two copies of the iTrip device – one back in late 2007 for myself, and a second one a year ago for my wife. Both devices are still in great working condition. Although the iTrip has an MSRP of US $70, it’s currently going for about $34 shipped on Amazon.com as I write this. Highly recommended, particularly at that reasonable price. Finally, a brief plug for a specific podcast: If you’re into video games, check out the Gamers With Jobs podcast. It’s a group of a few adult gamers that talk weekly about current games (across all of the major console platforms and the PC), and interesting gaming-related topics. The group has great chemistry and the show is often pretty funny. And it’s commercial-free! It’s my favorite podcast. So – try making your daily commute time more interesting and/or productive by listening to a podcast on a topic of interest to you while you’re driving back and forth to work, instead of just defaulting to whatever happens to be on the radio!
Just because I couldn’t find this information when I was searching for it now: In Microsoft Office 2003, the keyboard shortcut to close (hide) the task pane is Ctrl+F1. (The task pane in Office 2003 is the panel on the right side of the window that is usually hidden, but opens to show certain information such as Help (upon a press of F1), “Getting Started”, the Office clipboard ring, and other items.) This shortcut applies to Word 2003, Excel 2003, and PowerPoint 2003 (possibly among others).
Quick tip: In Microsoft Word, in a document with in-document hyperlinks, after navigating to another location in the document by clicking on a hyperlink (typically by holding Ctrl and clicking the link, as Word will prompt when the mouse cursor is hovered over a link), you can go back to where you were before in the document by using Alt+LeftArrow (hold down the Alt key and press the Left Arrow key) – similar to clicking on the Back button in a web browser. Alt+RightArrow also works to go forward once again after using the Alt+LeftArrow shortcut to go back. These are a good shortcuts to be aware of, since Word doesn’t by default show Back/Forward buttons in the toolbar like a browser does. (This is the case in Word 2003 – I don’t have a copy of Word 2007 in front of me at the moment to check.) In Word 2003, you can get Word to show Back/Forward buttons in the toolbar by making Word’s Web toolbar visible. (Right-click a blank area of the toolbar at the top of the Word window, and select Web from the context menu that appears.) The Alt+LeftArrow and Alt+RightArrow keyboard shortcuts to navigate Back or Forward respectively also work in most web browsers on Windows.
It is possible to set up sections of “mirrored content” in Microsoft Word, such that the same content appears in two or more places in the document, and changes to the content in the “master” location are automatically mirrored to the other instances of the content. The following instructions apply to Word 2003; I’ve done this in Word 2007 as well, but the specific procedure will differ slightly due to 2007’s use of the Ribbon interface rather than the traditional menu. 1. Designate the master content To designate the “master” (primary) version of the content to be mirrored, select the content (e.g. by left-clicking and dragging the mouse cursor over it), and then create a “Bookmark” on the content by selecting Insert | Bookmark from the menu. In the Bookmark dialog, add a new bookmark and name it whatever you like. Tip: You may also want to enable “Show Bookmarks” at Tools menu | Options | View tab, so that you can see the bounds of the bookmark you created. 2. Place the mirrored content Now, go to the place in the document where you want the mirrored copy of the content to appear. At that location, add a “Cross-Reference” via Insert menu | Reference | Cross-reference. In the Cross-reference dialog, set Reference Type to “Bookmark” and Insert Reference To to “Bookmark Text”; in the For Which Bookmark field, select the bookmark you created. Optionally, you can leave the “Insert as hyperlink” dialog checked. If this is checked, the mirrored content will still appear normally (it won’t be underlined like a typical World Wide Web hyperlink), but readers of the document will be able to Ctrl+click the mirrored content to jump to the location of the master copy of the content. Finally, click the dialog’s Insert button, and then the Close button. The mirrored copy of the content should now appear in the document! 3. Updating the mirrored content The mirrored content will not immediately automatically update when the master content is updated. You can update the mirrored copy manually by right-clicking the mirrored text, and selecting “Update Field” from the context menu that appears. You can update all of the mirrored content in the document at once by selecting the entire document (Edit menu | Select All; or press Ctrl+A), right-clicking anywhere in the document, and selecting “Update Field.” All mirrored content fields (and any other fields that may be present in the document) will be updated. Alternatively, you can set Word to automatically update all fields in documents each time the document is printed. To do this, in Tools menu | Options | Print tab, select the Update Fields check box. Bonus Tip: Capitalizing the mirrored content Optionally, you can make the mirrored content appear in ALL CAPS even if the master content is mixed-case. To do this: - Right-click the mirrored content; from the context menu, select Edit Field.
- In the Field dialog, click the Field Codes button.
- In the Field Codes text box that appears, type the following text at the end of the existing content of the text box:
\* UPPER
- Click OK. The mirrored content should now appear in all uppercase!
(Thanks to Graham Mayor for the tip on the capitalization field switch. See Graham's site for lots of other advanced tips regarding what can be done with Word fields.)
A quick tip on a discovery I just made: You can quickly reorder bullet points in Microsoft Word putting the caret in the bulleted item to be reordered (i.e. click on the item), and then use Alt+Shift+UpArrow or Alt+Shift+DownArrow to reorder the selected item within the list of bullet points. Apparently this works in other MS Office programs as well (such as PowerPoint). I’ve found that this works a lot more nicely than cutting the item to be moved, and then pasting the item in the new location in the list (since often, line breaks need to be fixed up after the new item is pasted in.) Bonus tip: Alt+Shift+LeftArrow and Alt+Shift+RightArrow will indent/unindent the selected bulleted item.
While using Firefox 3 to work with a web application that uses basic authentication for access control earlier today, I wanted to be able to log in to the application as a different user account without needing to close and restart Firefox in order to get it to stop automatically resending the authentication data from my original login. (After logging in to a site via basic authentication, Firefox will automatically continue to resend the credentials from that login on any subsequent requests to that same site, until the browser is shut down.) After hunting around for a while looking for a Firefox extension that would do this, I discovered a way to do this built into Firefox itself: In the Tools menu, select Clear Private Data; then in the Clear Private Data dialog that appears, check the Authenticated Sessions checkbox, clear all other checkboxes, and click the Clear Private Data Now button. 
This will get Firefox to "throw away" its saved basic authentication credentials from the current session, and allow you to log in as another user, without having to close Firefox. I've found this to be handy when I have a lot of Firefox tabs open, and don't want to shut down Firefox (and close all of my open tabs in the process) just to "log out" of the basic authentication session that I have open in a particular tab.
A quick tip for Microsoft Excel that I've just found, and is currently making my life easier: Shift+F2 jumps to editing the cell comment (note / annotation) for the current cell. This is a lot nicer than having to go over to the mouse and right-click on a cell, then choose "Edit Comment" (or "Insert Comment" in the case of a cell that doesn't have a comment yet) from the context menu when doing heavy editing work on an Excel sheet. This works in Excel 2003; it might also work in other Excel versions as well. Bonus tip: F2 alone (without holding Shift) edits the existing value in the current cell. This is another time-saver that allows you to edit the value in a cell without having to move over to the mouse. The use of F2 to mean "edit the current value" is a semi-standard that works in many other Windows applications as well. For example, F2 in Windows Explorer begins editing the name of the selected file or folder (to allow the file or folder to be renamed).
It is possible to do a Google search and restrict the results to a single domain by using the Advanced Search form. You can also use the regular search form with syntax like: search term(s) site:siteName.com where siteName.com is the site you want to search. Google will show you search results from just that one site. For example: Search for "football" at umich.edu.
As of the time of this writing, the Advanced Search form doesn't seem to support searching multiple specified domains instead of just a single one; adding a space between the domains entered on the "Search within a site or domain" field doesn't work (Google automatically removes any spaces before performing the search). Using one of the characters , ; : in the field as a delimiter doesn't work, either.
However, you can do a multiple domain search by using syntax like this in the regular search form: search term(s) site:siteName1.com OR site:siteName2.com where siteName1.com and siteName2.com are the sites that you want to search. For example: Search for "football" at umich.edu and msu.edu.
File this one under "so obvious that I couldn't figure it out!" Earlier today, I installed the recently-released Windows Search 4 for Windows XP. I'm going to give it a try not so much as a search tool, but primarily as a means of opening documents more quickly in cases when I already know where the document I want is located, but the location is multiple levels deep in my filesystem hierarchy, and it takes a few seconds to drill all the way down to it; I'm hoping just typing a few characters of the document's name and then opening the document from the search results turns out to be faster. When I installed Windows Search 4, it placed a search bar on my Windows Taskbar. I didn't really want the search bar there; I like to have maximum real estate available on the Taskbar for my open applications' buttons. (I don't have the Quick Launch bar or any other widgets present on my Taskbar, either; I use SlickRun to launch apps quickly using only the keyboard.) I'm also currently running a black Windows theme and a black desktop background, and the bright white rectangle of the search field was a bit of an eyesore. Since I knew that I could also bring up the search field with the global Win+F keyboard shortcut (as Windows Search 4 replaces the default Windows search functionality, including the Win+F shortcut), I poked around in the Windows Search options for a way to hide the search field on the Taskbar. Not seeing any relevant options there, I Googled for an answer, and didn't come up with anything immediately, but eventually found the answer in a reader comment in a downloadsquad.com article comparing Windows Search 4 and Google Desktop 5.5. Commenter "Quikboy" on that article noted that it is possible to hide the Windows Search field on the Taskbar, not from within the Windows Search options, but in the same way that you can hide any other Taskbar widget: Right-click an empty portion of the Taskbar, then on the context menu that appears, open the Toolbars sub-menu, and uncheck Windows Search Deskbar. So, that problem is solved! It remains to be seen how useful Windows Search 4 turns out to be in my everyday work, but at least while I'm making that determination over the next few days, I won't have the search field cluttering up my Taskbar!
Quick tip for ThinkPad owners: the media control keyboard keys located on the arrow keys at the bottom-right corner of the keyboard can be used to control music or other media playing in Windows Media Player (WMP) even when WMP isn't the foreground application! 
To use these keys, hold down the blue "Fn" key at the bottom-left corner of the keyboard, and press the appropriate arrow key. With these keys, I can have music playing in Windows Media Player in the background (or in a minimized window), and be working in other applications in the foreground. Then, when I get interrupted and want to pause my music (when the phone rings, or when a visitor arrives at my desk), instead of having to open the WMP window and click on the Pause button, I can just quickly push Fn + Play/Pause (the down arrow key), and my music is paused. Another press of Fn + Play/Pause, and my music starts playing again. Quite handy!
A quick tip to make your Windows Taskbar a lot more usable is to expand its area and make it two rows high instead of one. A pair of pictures are worth 2000 words: 

These two images show the same Windows XP Taskbar with 12 applications running, and a bunch of icons in the system tray. The difference is that in the second image, the Taskbar has been expanded to be two rows high instead of just one. With the increased area available on the Taskbar, it's much easier to read the text that accompanies the icon on each application button, making it a lot easier to find (for example) a specific Firefox window or Word document. To increase the number of rows in the Taskbar in this manner, just use the mouse to drag the top edge of the Taskbar upwards. (You'll need to temporarily unlock the Taskbar first if you have it locked: Right-click an empty portion of the Taskbar, and uncheck the "Lock the Taskbar" option from the context menu that appears.) Increasing the Taskbar area to two rows has a few other benefits as well: - The system tray icons are grouped into three rows instead of just one, saving a lot of horizontal real estate on the Taskbar. As a result, there's even more room available for application buttons to be shown.
- Windows shows the day and date in addition to the time on the right edge of the Taskbar; no need to hover over the time display with the mouse to see that information anymore.
- Although it isn't shown in the screen cap above, I've found that the bit of empty space below the Start button is a great place to tuck a SlickRun command line into.
With the large screen resolutions (and hopefully, multiple monitors) available on modern machines, the additional screen real estate consumed by increasing the Taskbar size to a second row is trivial compared to the usability and productivity gains realized by doing so. (You might also note that I have the "Group Similar Icons" option from the Taskbar's Properties dialog turned off. That option does save some Taskbar real estate, but at the significant cost of not being able to identify or access specific application windows from the Taskbar with a single-click. Again, with the large amount of screen real estate available on modern systems, I don't see the benefit in ever having that option enabled.)
On Windows, it is possible to get into a situation where one or more application windows are positioned entirely outside of the bounds of the viewable area of the monitor. This can sometimes happen with a machine in a multi-monitor setup where one of the monitors is disconnected; an application window that is in the minimized state at the time that a monitor is unplugged can, when the window is restored (un-minimized), be restored to a position somewhere off the screen, in what was the viewable area of the disconnected monitor.
Here's one way to "rescue" such an off-screen window and bring it back onto the active monitor:
- Make the off-screen window the active window by clicking on its icon in the Windows Taskbar.
- Press Alt+Space, and then press the M key. This will activate the window's system menu, and put the window into "move mode."
- Press any arrow key once. This will put Windows into a mode where moving your mouse will drag the active window around the desktop (even without holding in a mouse button).
- Move the mouse around until the window reappears on the active monitor.
- Left-click once with the mouse (anywhere) to exit "move mode."
That's it! This works on Windows XP, Windows Vista, and Windows 7. I hope this helps!
|
|






 Posts
Posts

