There's an easier way to reorder bullet points in Google Docs than cutting and pasting! - Position the insertion point over the bullet point line you want to move.
- Press Ctrl+Shift+⬆ (up arrow) to move the line up, or Ctrl+Shift+⬇ (down arrow) to move the line down.
I’ve found that this works a lot more nicely than cutting the item to be
moved, and then pasting the item in the new location in the list (since
often, line breaks need to be fixed up after the new item is pasted
in).
If you select multiple items in the bulleted list first, then the aforementioned keyboard shortcuts will move them all together, as a group. This tip works for reordering or moving regular paragraphs, too, in addition to bullet points. Want to do the same thing in Microsoft Word? Check out my (much!) earlier post, Tip: How to easily reorder bullet points in MS Word, from 2009!
Firefox is my favorite web browser. It supports proper Ctrl+Tab behavior, it's fast, and it's a leader when it comes to prioritizing the privacy of individual users over the agendas of corporate ad networks.
I also like keeping my work-related stuff and my personal stuff organized into two separate browser programs. A big advantage of that is I can be logged in to my work Google account (for email, calendar, etc.) in the first browser, and my personal Google account in the second browser, and don't ever need to manually switch back and forth between which account is currently active.
(Separate browser programs -- not just browser windows -- is needed for this to work. Separate browser programs, such as Firefox and Chrome, don't share cookie storage with one another, which means that they have completely separate records of your login information for each website.)
As a bonus requirement, I want to be able to tell at a glance whether a given browser window that I've got open in front of me belongs to my "work" or "personal" browser.
Finally, with Firefox being my preferred browser, I'd like to be able to use it for both my work stuff, and my personal stuff. Given that I need to be using two different browser programs in order to keep my work and personal stuff separated, is it impossible?
Enter: Firefox Developer Edition
As you've likely guessed, this all is possible, by installing Firefox Developer Edition!
Firefox Developer Edition is like the standard Firefox browser, but with a few additional programmer-oriented bells and whistles. For most practical purposes, though, it works just like the standard Firefox.
Most importantly for this post's use case, Firefox Developer Edition fully supports being installed, and running, side-by-side with Firefox. The two browsers each have their own separate cookie storage, and so each supports being logged in with a different user account to the same website, such as Google, at the same time.
Firefox and Developer Edition can also be themed (given a custom appearance) separately. I've landed on assigning a simple orange theme to my Firefox, and a simple blue theme to my Firefox developer addition, so telling which browser a given window belongs to is as simple as glancing at the top of the window, and looking at the color.
I'd encourage even non-developers who like Firefox, and are interested in separating out your personal and work stuff into separate browsers, to give this a try. There's nothing "scary" about Firefox Developer Edition; it's easy to just use it as another copy of Firefox.
Since all the way back in 2008, during most of which Windows was my daily-use operating system for work and hobbies, I used, and was a big fan of, a utility called TimeSnapper. Billing itself as "The Automatic Screenshot Journal", TimeSnapper quietly would run in the system tray of my Windows computer, taking a screenshot of whatever application I was actively using every few seconds. TimeSnapper additionally came with a "Play Your Day Like a Movie" feature, where I could watch my entire day of work, or jump directly to the screenshot of any point in time of the day.
TimeSnapper saved me on multiple occasions where I would have otherwise lost work. A couple of examples of this:
- I'd been typing some long-form text into a form on a web page, only to have the browser crash and lose all of my work. Without TimeSnapper's most recent screenshot of my work-in-progress post, I'd have had to recreate the text from scratch, instead of simply having to retype it. (See my 2014 tweet about the incident!)
- I'd run into a problem with a program, where it displayed a particular error message in a dialog. A few minutes later, I wanted to Google the error to try to find a solution. I couldn't remember the exact text of the error in order to type it into Google... but TimeSnapper had captured an image of the error dialog, so there was no problem!
In early 2017, taking on an assignment with a new product at work, I switched to working on a Mac, making my primary daily-use operating system macOS instead of Windows. One of the first things I did, naturally, was to look for macOS equivalents of the essential utilities that I had come to rely on for software development and other work on Windows.
Although I was able to find many useful equivalents for utilities such as clipboard history saving, I wasn't able to find anything like TimeSnapper. Seemingly at least once every week after switching to Mac, I'd run into some situation like the ones described above where I wished I could look back in time to retrieve some important piece of information that I know I had on screen a short time earlier, but was now lost.
Fast-forward to the present day, and I'm super excited to announce: The official release of TimeSnapper for Mac is now available!
Why am I able to announce this? Because, in partnership with the original developers of TimeSnapper for Windows, Leon Bambrick and Atli Björgvin Oddsson, I am the developer of TimeSnapper for Mac!
By late 2017, I was frustrated enough with not having TimeSnapper or a similar utility in my day-to-day work that I reached out to Leon, asking if there was any news around a Mac release of TimeSnapper. Leon replied that there was not; but after some conversation, he offered me the opportunity to develop it!
After a long journey, starting with me not even knowing whether making a macOS version of TimeSnapper would be at all possible -- for example, whether macOS even had operating system hooks allowing an application to perform screen captures -- TimeSnapper for Mac is now complete, and is available on Apple's Mac Store as of today!
Some of the major milestones in TimeSnapper for Mac's development, using Objective-C and Xcode, included:
- Getting a simple, UI-less program working which successfully managed to take and save to disk a screen capture of the Mac desktop.
- Making the program "wake up" at regular intervals to take screen shots -- and continue to do so even if the computer is put to sleep.
- The ability to pause, and later resume, the capture of screen shots on command.
- Adding an option to reduce screen shots in size and/or quality before saving them to disk -- and adding a Preferences window for the user to control these options, as well as the delay between screenshots and the image format (.jpg or .png).

- An option to capture just the foreground application window, the entire monitor where the application is running, or all monitors (on a multi-monitor system). Due to the way the relevant macOS hooks work, just successfully identifying the foreground-most window was surprisingly challenging, but after lots of effort and testing, TimeSnapper is able to get it right for almost all applications.
- Adding a "preview image" of a screen shot to the Preferences window with the selected size and quality options applied, as well as an estimate for how large the screen shot would be on disk with the selected options.
- Adding "auto cleanup" of old screen shots to save disk space, along with Preferences window options for the user to specify a maximum age of saved screen shots, and/or maximum disk utilization for all screen shots.
- An option to open a new Finder window, navigated to the folder where TimeSnapper saves its images.
- Getting TimeSnapper to optionally start automatically after reboots. (This functionality on Mac was almost shockingly difficult to implement relative to what I expected, requiring quite a bit of code along with a whole "sub-application".)
- Getting TimeSnapper to appear as an icon and menu in the Mac's
top Menu Bar, and to display its larger Dock icon only when one of its
windows is open.
- An initial "Play Your Day Like a Movie" window, displaying one of the saved screen shots.
- Adding a timeline to the Play Your Day window, displaying a range of hours corresponding to the earliest and latest screenshot captured for a selected day, and a tick mark on the timeline for the time of every individual screenshot taken.
- Getting a mouse click -- and later, drag -- on the timeline to change the image display to the image taken nearest to the clicked time.
- Adding the eponymous ability for the window to play the selected
day's screenshots like a movie, with playback controls for
starting/pausing the playback and increasing or decreasing the playback
speed.

- Handling local time changes properly, so that "going back in time" by carrying the Mac across a time zone boundary from east to west, or at the end of Daylight Saving Time, doesn't cause screen shots to appear out-of-order in the Play Your Day window, or to potentially overwrite one another.
- Lots more polish and bug squashing!
It's been a genuine pleasure over the past few months, in the later phases of development, to once again have had TimeSnapper running on my daily-use computer -- now, a Mac -- affording me the ability to easily peer back in time and see exactly what text or activity I previously had on my screen!
Check out TimeSnapper on the Mac App Store! If you like it, I'd love it if you'd leave a nice review, or just drop me a line (here in the comments, or find me on Twitter) and let me know what you think!
Here’s a quick tip on selecting text with the mouse that I’m blogging as much to help myself remember as to inform you, the reader: You can double-click-drag – that is, double-click, and continue holding the mouse button on the 2nd click – to select multiple entire words from a block of text. This obviates the need to position the mouse cursor exactly over the small space between words when selecting entire words or sentences, both when beginning and ending the selection. Bonus tip: You can triple-click to select an entire line or paragraph of text. (This one I do remember and use frequently – and get annoyed by those few applications that don’t support it.) These tips work in most applications on both Windows and Mac.
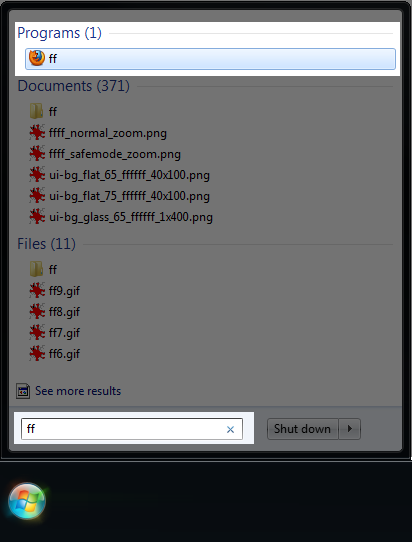
This article describes a way to configure Windows 7 to launch applications and websites from the “Search programs and files” field in the Windows 7 Start menu using custom-defined shortcut keywords – without using the mouse at all. This is similar to the functionality of 3rd-party utilities such as Slickrun, Launchy, and Quicksilver, but with this method, no 3rd-party software is required! As an example, this technique could be used to set up the keyword “ff” as a shortcut for launching the Firefox browser. You would be able to launch Firefox from anywhere in Windows simply by typing the following four keystrokes: [Windows Key]
ff
[Enter] Doing this would bring up the Windows start menu and enter “ff” into the “Search programs and files” field; after having followed the steps detailed in the remainder of this post, Windows will recognize “ff” as a “Program”, and therefore will give it the focus automatically; you can then just press Enter to launch “ff”, which is configured as a shortcut for launching Firefox. This is shown in the highlighted portions of this screen capture of the Windows 7 Start menu: 
Step 1. Create a “Shortcuts” folder Create a new folder named Shortcuts at location: %appdata%\Roaming\Microsoft\Windows\Start Menu\Programs\ The folder doesn’t have to be named Shortcuts; you can use something else if you like. Note that because this folder is created under the Start Menu\Programs folder, this new folder and its contents will show up as a folder on your Start menu. Why does the folder need to be created at this location? This needs to be done so that Windows will recognize shortcut files placed in that folder as “Programs” when the shortcut filename is keyed in to the “Search programs and files” field on the Start menu. Step 2. Create a shortcut to the new Shortcuts folder This step is optional, but to make things easier, I suggest that the first new shortcut you create is a shortcut to bring up the Shortcuts folder itself in a new Windows Explorer window. One way to do this is to manually open up an Explorer window (Shortcut key: [Windows Key] + e) and enter in that window’s address bar: %appdata%\Roaming\Microsoft\Windows\Start Menu\Programs\Shortcuts Then, drag the yellow folder icon from the left side of the address bar into the main area of the window to create a shortcut to that folder. Finally, rename the shortcut (Shortcut key: [F2]) from Shortcuts – Shortcut to just shortcuts. Once this is done, you can test the new shortcut by pressing [Windows Key] to open up the Start menu, typing in “shortcuts”, and pressing [Enter]. A new Windows Explorer window should open, showing the Shortcuts folder. Step 3. Create Application Shortcuts Now you’re ready to create some shortcuts to run applications! To create a named shortcut to launch a particular application, just create a shortcut to that application in the Shortcuts folder you created, and name the shortcut file to whatever you want the keyword to launch the application to be. Then, to test the shortcut, press [Windows Key], key in the shortcut name, and press [Enter]. One easy way to create a shortcut to a particular program is to use the right mouse button to drag and drop that program’s entry from the Start menu to a Windows Explorer window that’s open to the Shortcuts folder. After dropping the item, select “Create Shortcuts Here” from the context menu that appears. After keying in the shortcut name (and before pressing enter), you should see your custom shortcut appear immediately as the first item in the list of real-time search results that Windows generates under the “Programs” heading. Since Windows considers the shortcut to be a “Program,” pressing enter causes Windows to run that program without you even needing to arrow key down to that search result in the Start menu – Windows selects it for you by default. Nice! One caveat: For me, for certain single-character shortcuts (such as “g”, but not “n”), Windows doesn’t recognize the shortcut file as a “Program” in the start menu. If a given single-character shortcut doesn’t work for you, I’d suggest trying a two (or more) character shortcut keyword instead; all two-or-more-character shortcut keywords that I’ve tried have worked for me. To give you some ideas on getting started with creating your own shortcuts, here are just a few of the shortcuts that I currently have set up on my local PC: These shortcuts even work with parameters, for example, with my configured “timer” shortcut, I can key in “timer 5m” to start Orzeszek Timer running with a 5-minute timer. Step 4. Create Website Shortcuts You can also set up shortcuts to launch a particular website in your default web browser. To do this, just create a new shortcut from Windows Explorer in your Shortcuts folder (right-click | New | Shortcut), and in the item location field, paste the URL of the target website (such as “http://blog.jonschneider.com”, without the quotes). Then, name the new shortcut with the keyword you’d like to type to launch that website, and that’s it! Open Question: Websites with Parameters One thing I have not yet figured out how to do using this technique is to elegantly set up a shortcut to launch a website with a particular parameter. For example, I’d like to be able to key in “g search terms” to bring up Google in a new tab and the default browser, and run a search for search terms. That is, a new browser tab would be opened with the url http://www.google.com/search?q=search term. If anyone knows of an elegant way to do this (without resorting to the use of a 3rd-party background program like Slickrun), please leave a comment and let me know!
I have a 15-minute commute by car to work – so that’s about 2.5 hours I spend in the car going to and from work on a typical week. Occasionally I listen to music in the car, but most often I prefer listening to talk. Historically, I would typically listen to AM radio on the commute: sports, news, or just whatever was on any station I could find that wasn’t on commercial. For the past couple of years, though, I’ve listened to podcasts on the commute instead. For anyone unfamiliar with the term, a typical podcast is essentially a talk radio show that you can download online for free, and listen to on an mp3 player. Listening to podcasts have several significant advantages over AM radio: - Choice of Topic. At any given time, there are only a few topics available to listen to on talk radio shows. By contrast, there are a podcasts on a multitude of topics available for free download online. I’ve replaced listening to general news and sports talk on my commute with topics that are specifically of interest to me, like software engineering, Christian apologetics, and video games.
- On-Demand / Pauseable. With a podcast, the show starts exactly when I sit down in my car in the morning. And when there’s something interesting being discussed as I arrive at work, instead of missing the end of the discussion, I can just pause my mp3 player, and pick up the show right where I left off when I begin my commute home in the afternoon.
- Limited or No Commercials. Whereas a typical radio station plays commercials as much as 15% of the time or more, many podcasts are produced on a volunteer basis and are totally commercial-free. In my experience, in those podcasts that do run ads, the ads are fairly limited. And as a last resort, you can always skip past any particularly intrusive commercials that do happen to be present using the fast-forward function on your mp3 player!
My current mp3 player is an Apple iPod, so I use Apple’s iTunes software to subscribe to podcasts, and have the latest episodes automatically download to my PC. Then, when I sync my iPod with my PC (which I typically do once a week or so), I get several new episodes of my favorite podcasts to listen to on my commute over the next several days. Easy! (If you don’t have an iPod, there are several free RSS software packages out there that support audio files that you can use to subscribe to podcasts, and have the .mp3 files automatically download for you.) The only remaining challenge, then, is how to get the mp3 player output to play through the car speakers (since it’s for obvious reasons dangerous, and apparently in many places illegal, to drive while wearing headphones). With an older car, you can get an inexpensive device that converts an audio cassette player into a line-in jack for an mp3 player. Many newer cars these days come with a line-in jack built directly into the stereo system. However, I drive a model year 2005 car that has neither a line-in jack nor a cassette player. The solution I landed on for listening to my iPod in my car was a Griffin iTrip FM Transmitter / Charger. The device is essentially a short-range FM transmitter does a a short-range FM radio broadcast of whatever is playing on your iPod, using an FM frequency that is unused in your area (a frequency that you specify). Then, you just tune your car radio to that same FM frequency, and you can hear your iPod podcast (or music) over your car’s stereo system! I’ve actually bought two copies of the iTrip device – one back in late 2007 for myself, and a second one a year ago for my wife. Both devices are still in great working condition. Although the iTrip has an MSRP of US $70, it’s currently going for about $34 shipped on Amazon.com as I write this. Highly recommended, particularly at that reasonable price. Finally, a brief plug for a specific podcast: If you’re into video games, check out the Gamers With Jobs podcast. It’s a group of a few adult gamers that talk weekly about current games (across all of the major console platforms and the PC), and interesting gaming-related topics. The group has great chemistry and the show is often pretty funny. And it’s commercial-free! It’s my favorite podcast. So – try making your daily commute time more interesting and/or productive by listening to a podcast on a topic of interest to you while you’re driving back and forth to work, instead of just defaulting to whatever happens to be on the radio!
Although I am currently in the process of building a new PC for home, which will run 64-bit Vista and will become my new primary home PC, as of now (October 2008), I am still running Windows XP as my primary operating system both at home and at work. In recent years, I've accumulated a collection of software that in one way or another enhances the basic, low-level Windows XP user experience, and allows me to be more productive (or to just enjoy using my machines more!) This post details my Top 8 Windows XP customizations. Some of these may apply to Vista as well; once I have my new machine up and running with Vista for a while, I'll reprise this post and report which of these customizations are still useful under Vista, and which ones are no longer needed. There might also be some new additions to the list; time will tell! Note: Large applications such as Firefox are outside the scope of this list; I'm focusing in here on items that modify the behavior of Windows itself, or are otherwise basic utilities or tools that tweak the way that I use Windows. Homepage: http://www.ntwind.com/software/windowspace.html
Author: Alexander Avdonin
Supported Operating Systems: Vista, XP, 2000; 32-bit and 64-bit versions available
Price: US $34.90 (30-day free trial available)WindowSpace provides the cool feature of having windows "snap" to the edges of the screen, and to other windows, as you drag or resize windows using the mouse as you normally would. This is nice for taking advantage of the real estate of your screen area; before using WindowSpace, I would typically leave "dead space" between the borders of my non-maximized windows and the edges of my screen, because it was a nuisance to try to position a window exactly against an edge of the screen. Alexander really nailed the feel of how the "snap" behavior works; it feels very natural and intuitive. It also works just fine with multiple monitors. WindowSpace also provides some handy global hotkeys for resizing a window via the keyboard such that it is positioned against a desired edge of the current screen, and for other functionality related to window positioning and sizing, which can be remappend, and enabled or disabled. This is essentially the nice, fast desktop search built into Vista, back-ported to Windows XP. I have had an occasional issue with Windows Search 4 not finding an item that I know is present on my local hard drive (including items that have been around for a while, so it isn't an issue of the Windows Search indexer just not yet having added a newly-created document to its index); but for the most part, this is a great (and free!) improvement over the default local search functionality that ships with Windows XP. Note: Windows Search 4 does by default add a somewhat unsightly, screen-real-estate-consuming search field to the Windows Taskbar; I posted previously about how to hide the search field. I use the Win+F ("find") shortcut key to bring up Windows Search when I need it. #6: XP Black ("Zune") Style/ThemeHomepage: None; direct download link: http://go.microsoft.com/fwlink/?LinkID=75078
Author: Microsoft
Supported Operating Systems: XP
Price: FreeRather than a utility or functionality enhancement, this just plain makes Windows XP look cooler. This Black (or "Zune") style gives you another alternative to the default blue XP style (and the built-in silver and olive alternative styles) and the gray "classic" style. It was apparently developed by Microsoft to promote their Zune portable media player (hence the name). Even if you're not a Zune fan (I'm not a Zune owner, myself), this black style makes Windows XP look a lot sharper.  The theme doesn't currently seem to have a homepage anywhere on the Microsoft site, but you can still download the file directly from the Microsoft site, here: http://go.microsoft.com/fwlink/?LinkID=75078 (ZuneDesktopTheme.msi; 1.6 MB) Author: Suresh Online
Supported Operating Systems: XP, 2000, NT, ME, 98, 95
Price: FreewareClipPath adds an option to the right-click menu of Windows Explorer when a file or folder is clicked: "Clip Path" (to the clipboard). This is very useful to essentially get a reference to a filesystem file on the clipboard, which you can then paste directly into the "File | Open" dialog of another application (rather than using the dialog's GUI to drill all the way back through the filesystem to the file's location). I previously discussed ClipPath in a Utility of the Day post.  TaskSwitchXP is a great improvement to the default Alt+Tab interface provided in Windows XP. It supports several nice enhancements over the basic XP Alt+Tab interface: - Display of the full Titlebar text of all applications (not just the selected one), in addition to the application's icon;
- A preview of the appearance of the selected application's window;
- Allows an application to be selected via a mouse click (instead of only via Alt+Tab and Alt+Shift+Tab);
- Better support for many (22 or more) open applications.
Homepage: http://ditto-cp.sourceforge.net/
Author: Open Source (project admin: Maloney)
Supported Operating Systems: Vista(?), XP, 2000, NT, 98, 95
Price: FreewareDitto enhances the Windows clipboard such that when an item is placed on the clipboard, whatever was on the clipboard previously isn't lost, but is instead saved into a persistent storage area. A global Ditto Paste hotkey (I use Ctrl+Alt+V) can be set up to bring up Ditto's paste interface, which allows you to quickly paste an item that was stored to the clipboard recently, or even to do a search on older clipboard items and paste one of those. I didn't use Ditto heavily right after I installed it, but I've found that over time, I've come to rely on and take advantage of the productivity benefits of old clipboard items not being erased when something new gets saved to the clipboad. I previously posted about Ditto in a Utility of the Day post. Homepage: http://nerdcave.webs.com/
Author: Jay E.
Supported Operating Systems: Vista, XP, 2000, NT, 98, 95; 32-bit versions only
Price: FreewareI originally downloaded this utility for one reason: I wanted the ability to close applications from the Windows Taskbar by middle-clicking them (just like you can do in Firefox and other tabbed applications); after all, what is the Windows Taskbar if not a tabbed view of the system's open Windows applications? Taskbar Shuffle enables this middle-click-to-close behavior for taskbar tabs. Much easier than doing right-click | Close on many open applications (especially for those applications that put the "Close" option somewhere non-standard on the right-click menu). I've since started also Taskbar Shuffle for its primary purpose: Moving taskbar buttons around on the taskbar via drag-drop. The most obvious use case for this is moving my mail client back to its position at the top-left corner of the taskbar (where I always expect it to be!) after it crashes and I re-open it. Unfortunately, Taskbar Shuffle doesn't currenly support 64-bit versions of Windows. Taskix is an alternative which apparently has very similar functionality to Taskbar Shuffle and does support 64-bit Windows (including Vista), but I haven't tried it out yet myself. Update 7/1/2009: A 64-bit version is now available! Nice! Go check it out. I previously covered Taskbar Shuffle in a Utility of the Day post. Homepage: http://www.stevemiller.net/puretext/
Author: Steve Miller
Supported Operating Systems: Vista, 2003, XP, 2000, NT, ME, 98, 95
Price: Freeware PureText does just one thing, and does it very well: It sets up a global hotkey for "Paste unformatted text." It takes the text that you previously copied to the clipboard and pastes it into the current application, but without any rich text markup that might be stored in the clipboard along with the text. I typically use this at least on a daily basis, sometimes many times per day. For example: - Paste some code from Visual Studio or Eclipse into MS Word, without getting the font and background color from the IDE.
- Paste text from Word into another document (such as an email, a Powerpoint presentation slide, or a cell in an Excel sheet) in the current font of the target document, instead of the font from the Word document.
PureText allows you to assign the hotkey that will be used for this operation. I use the default of Win+V. The net result of the operation is like pasting the text into a plain notepad.exe window, and then re-copying and pasting it from Notepad into the target document; or like the MS Office menu option Edit | Paste Special | As Unformatted Text; but in a single, easy, step. Also, unlike the MS Office solution, PureText works regardless of the target application of the Paste is. ConclusionIn my experience with these utilities, each of them has been rock-solid stable. I place a premium on stability of my system, and have had nothing but good experiences with each one of these customizations. I hope this list of utilities is useful; if a utility on this list is new to you and sounds interesting, I'd encourage you to "be bold" and go ahead and give it a try. If you end up seeing a net productivity benefit, great! If not, the uninstallers are there for a reason. :-)
Currently, there is a state of affairs at many companies that employ or software programmers or developers is that if a developer wants or needs something to improve their personal productivity -– for example, a new piece of hardware such as a 2nd monitor, or a book on a new software development methodology –- that need is essentially treated as "non-standard" or "out of the ordinary", and requires special approval from a manager.
After reading Jeff Atwood's recent blog post We Don't Use Software That Costs Money Here, I got to thinking: Wouldn't it be nice if every developer had a small discretionary budget from their employer of, say, U.S. $300 to go out and buy themselves things they want or need to help do their job better? The developer could just order themselves what they need -- no special approval required -- and then expense it to the company, up to that annual $300 limit.
What would the discretionary budget cover?
Some things that a developer could use the budget to purchase:
- Hardware:
- An additional monitor - around US $150-350
- A video card or laptop dock to run the additional monitor, if needed - $50-150
- A custom mouse or keyboard - $30-80
- Software development-related books/manuals - $30-60
- Non-free software tools - $5+
- Non-free development-related magazine subscriptions - $10-40
- Possibly, even "non-technical" things like a desk lamp or a nicer chair
Things the budget would not be intended to cover:
- The obligatory development machine upgrade every 3/4/5 years that developers generally need to be able to keep up with modern software.
- Major software packages that developers require to do their jobs, such as a copy of Visual Studio for developers working in a C# shop.
Why $300?
I picked $300 because it's enough to buy a modest amount of items that can make a real productivity impact; say, a decent $200 monitor and a couple of $50 books on development methodology. If a developer needs to spend beyond the $300 limit – say, to buy one more book, or to do something more expensive like attend a conference – they could just get special permission from their manager (as would otherwise be the status quo for any request, without the discretionary budget).
A budget amount of much more than $300 – say, $3000 – could be problematic because developers at some point would likely feel like they would rather have some of those budgeted funds go directly to their salary. $300, spread over an entire year, is an amount that is probably low enough for most developers not to feel annoyed that they are losing potential compensation.
Benefits
What are the reasons that an employer of software developers might want to set up a discretionary "productivity budget" for their developers?
- Productivity. Developers can use the budget to increase their own productivity, which directly translates to a productivity gain for their development team, and in turn, for their employer.
- Morale. Existing developers are happy because they can (within limits) just order themselves what they need, instead of needing to worry about getting approval from a manager, or that they might be "overstepping their bounds" by making a special request.
- Recruiting. Recruiting is benefited, as the discretionary budget can be presented as a differentiator to prospective hires. Prospective new employees could see the budget as a sign that the company is in tune with developer's concerns, and that the company's developers are empowered to make their own development-related decisions (rather than having such decisions be made by potentially non-technical management staff).
Costs
Why might an employer of software developers not want to implement this policy?
- Budget. If a development manager implements the $300 discretionary budget policy for his team, and there are 10 developers on the team, that's an annual cost of $3000 that needs to come from somewhere. Taken on its own, that figure might initially seem like a somewhat large amount for the manager to approach upper management and request. However, I would argue that the multiple real benefits provided by the discretionary budget (as outlined above) outweigh the relatively insignificant additional cost of the budget as compared to the (most typically) six figures already being spent on the developers' salary and benefit packages.
- Perception of lost salary. As noted earlier, the potential exists for some developers to be annoyed that the $300 is money that could be going towards an increase in their base salary. However, I think the potential for negative impact stemming from this perception is limited – I suspect there aren't too many developers today who are annoyed that they have such a nice development machine to work with, because their employer could have bought them a weaker machine, and passed the $150 saved along to them!
Who owns property purchased with the budget?
If a developer buys a monitor or a book with the money from their discretionary budget, who does that item belong to? Who owns the item?
The Developer. The developer owning such purchased items, no strings attached, probably isn't a good policy. There would be nothing to stop a developer from buying a new video card and taking it home to exclusively use for playing computer games. The employer wouldn't see any real benefit in that case, and the development budget might as well just be rolled into the developer's salary.
The Company. A policy of the employer owning purchased items is a possibility. If the developer leaves the company, the company would retain possession of any items purchased. There could be situations where developers might purchase specialized items, though, which the company wouldn't have any real interest in retaining, such as a left-handed trackball (in the case that there are no other trackball-favoring lefties on the team).
The Developer – with a caveat. An employee-friendly approach that blends these ideas would be to allow the developer to have ownership of purchased items, but stipulate that the items are for use at the office only. This would give the company all of the benefits of the developer gaining productivity through use of their purchases; and in the event that the developer leaves, the company wouldn't be out a significant amount of money. This would also mitigate any perception by developers that the discretionary budget funds are coming out of their salary.
Whatever ownership policy is chosen, there are cases where exceptions to the general policy would be reasonable; for example, the company might allow developers to purchase a development-related magazine and have it delivered to the developer's home address (rather than to the office), to allow the developer to read the magazine at home in their spare time.
What happens to leftover funds at year's end?
My suggestion would be that funds left over at the end of the year would not be carried over to the next year; time-limiting the budgeted funds in this manner would encourage developers to use the funds to improve their productivity (per the budget's intention), rather than "hoarding" budget dollars, or alternatively, just ignoring the budget.
One potential issue with this approach is that some developers might, at the end of the year, spend their budget on frivolous purchases, just so their funds aren't "lost." One possible way to deal with this might be to give developers a cash award equal to something like 20% of their leftover budget funds. A developer with $100 left over at the end of the year might then be encouraged to not spend their money, to get the extra $20 in their paycheck; but the 20% is a low enough amount that developers probably wouldn't be very motivated to purposely refrain from spending any of their $300 budget throughout the year, with the intent of earning a mere extra $60 at year's end.
A realistic implementation of an existing concept
Certainly, the idea that developers should be given significant latitude to obtain whatever equipment they feel they need to do their jobs, and to have other exceptional on-the-job benefits isn't a new one; good articles on this topic include Joel Spolsky's A Field Guide to Developers and Jeff Atwood's Programmer's Bill of Rights. However, I have observed that companies which aren't among the group of a relatively few "elite" development-centric companies along the lines of Google, Microsoft, Joel's Fog Creek, or Jeff's (until just recently) Vertigo would (and actively do) simply balk at the prospect of the required expenditure and (perceived, at least) questionable ROI of implementing Joel's and Jeff's suggestions.
On the other hand, a basic $300-per-developer budget at outlined in this article might be more palatable, and thus realistically more likely to be implemented, at the mainstream of companies that employ developers -- both software-industry companies, and companies in other industries that have developers on staff to develop internal applications.
Action Items
Developers, feel free to present the developer's discretionary budget as described in this article to your manager, and see if you can't get a productivity-enhancing discretionary budget approved for the developers on your team.
If anyone does get such a budget implemented at their workplace after reading this article, please do let me know. I would be happy to hear about it!
|
|




 Posts
Posts

