Showing posts with label overheat. Show all posts

Wednesday, April 06, 2016

New PC 2016: Things were not cool for a while there

One of the things I did to verify that my newly-built home PC was working well was to download and run a CPU temperature monitoring program, and leave that open in the secondary monitor while running programs in the primary monitor.

Unfortunately, this pretty quickly turned up problems. The CPU, an Intel Core i7-4790K, would get dangerously hot when running certain games. The game Cities: Skylines exhibited the worst symptoms: After running the game for just a minute or two, although the game itself would run great, the CPU temperature (as reported by the temperature monitor program) would shoot up to nearly 100 degrees C!  That’s close to the point where the PC will shut itself off to avoid damage, and much hotter than I would expect.

I thought the problem might be due to my having done a poor job applying the thermal paste to my CPU and/or installing the stock heatsink incorrectly, so I removed the heatsink, carefully cleaned off the old thermal paste, applied new thermal paste, and reinstalled the heatsink.  After doing that, though, the CPU temperatures while playing Cities were still extremely hot.

At this point, on the advice of some of the friendly folks at the Gamers With Jobs community, I decided to throw some hardware at the problem, in the form of a US $29 Cooler Master Hyper 212 EVO heatsink! 

I’d previously never bothered with “premium” heatsinks, since I don’t overclock my systems (valuing rock-solid stability over an incremental speed boost).  In this case, though, it seemed like the best option to protect the $340 investment I’d made in my nice CPU.

I’m very happy to report that it worked perfectly!  With the 212 EVO installed (replacing the stock Intel heatsink, and with another fresh application of thermal paste), CPU temperatures while playing Cities: Skylines dropped from nearly 100 C down to the mid-40s C!

One caveat that I discovered with the 212 EVO though is that it fastens to the motherboard from both sides, effectively pressure-clamping itself down onto the CPU.  Therefore, I needed to unscrew my motherboard from the case to install the new heatsink.  If you’re doing a build that includes a premium heatsink, I suggest installing the heatsink and CPU onto the motherboard before screwing the motherboard into the case!

A final additional purchase I made was a cheap ($8) case exhaust fan, since the case I used didn’t come with one.  I didn’t want the air inside my case warming up over periods of long computer use. 

CPU cases evidently come with quite a few variants of screw mounting hole spacings.  The distance between screw holes is not, as it turns out, the size of fan that you should order!  I found the chart on this quietpc.com page very useful (and accurate!) in translating the space between mounting holes that I measured on the back of my case to the size of fan that I needed to order.

Wednesday, August 31, 2011

Blank screen after Windows logo: Apparent broken video card

I got a call from my wife while I was at work yesterday: There was a problem with our primary home PC, which runs Windows 7.  As the machine was booting, after the BIOS data appeared followed by the graphical Windows 7 “loading” logo on the primary monitor, the primary monitor went into sleep mode (as though it had been unplugged from the PC).  By moving the mouse around, the mouse cursor was visible on the secondary monitor, but clicking it (including right-click) didn't do anything.

Getting home, I saw the problem for myself.  I concluded that the Windows logon screen was being displayed on the primary monitor -- I just couldn't see it because the primary monitor was off.  I was able to log onto the machine blind (by arrowing over to my user profile, hitting Enter to activate it, keying in my password, and hitting enter again to log in).  Once in to Windows, I was able to make my secondary monitor become the primary monitor, via right-click on the desktop, selecting Screen Resolution from the Right-click menu, “rescuing” the Screen Resolution window from the sleeping primary monitor onto the secondary monitor to make it visible, then checking the “Make this my main display” checkbox on the secondary monitor.

I spent pretty much the entire evening troubleshooting the problem.  Here the long list of troubleshooting steps I tried:

Verify both ends of the monitor cable were firmly seated: It was seated properly.

Cold reboot: No change in behavior.

Install the latest video driver (for the video card, an NVidia Geforce 6800 GT): No change in behavior.

Install the latest monitor driver (for the primary monitor, a ViewSonic VX2035wm connected via DVI): No change in behavior.

Uninstall the monitor drivers (and let Windows reinstall them after rebooting): No change in behavior.

Uninstall Microsoft Security Essentials (which I had just recently installed) (on the theory that MSE could somehow be seeing the ViewSonic monitor driver as malware): No change in behavior.  (I reinstalled MSE again afterwards.)

Restore the system to a restore point from a few days prior (when I know the monitor had been working fine): No change in behavior.

Reboot into Windows Safe Mode: This actually did get the logon screen, and then the Windows desktop, to display properly on the primary monitor.  I was even able to increase the screen resolution from the safe mode default (1024x768, I think) back to the native resolution of 1680x1050.  I was not able to use dual-monitor display, though; the Screen Resolution dialog only detected the primary monitor while in Safe Mode.  Rebooting again (back into normal mode) brought me back to square one.

Uninstall the video driver (then reboot): After rebooting, the behavior was similar to safe mode; the primary monitor worked, but not the secondary.  Upon reinstalling the NVidia video driver and rebooting once more, it was again back to square one.

Reseat the video card (with the PC powered off, then boot back up): No change in behavior.

Unplug the secondary monitor (leaving only the primary monitor plugged in) (then reboot): This didn’t help.  I still got, after rebooting, the BIOS information visible, the graphical Windows 7 logo visible, then blank screen / sleeping monitor.

Swap the ports that the two monitors’ DVI cables were plugged into, then reboot: This actually caused me not to get anything display on either monitor.  I changed it back afterward.

Check BIOS settings: I didn’t notice anything unusual, or any settings that I could change that might be likely to fix the problem.  I ended up leaving everything alone.

Finally, after all that, I hit upon a good solution: I replaced the video card.  Specifically, (after powering both machines down and unplugging them, of course), I pulled the GeForce 6800 GT from my primary machine and set it aside; then, I pulled the GeForce GT 430 from my HTPC (leaving that PC with just the motherboard’s onboard audio/video), and installed that card in my primary PC; then I booted the primary PC back up.  After doing that, and letting Windows install the NVidia display driver, both monitors came up with no problem.

So even though I had been pretty convinced initially that I was looking at a software problem, probably a driver problem of some kind (given that the primary monitor worked fine at boot time, and even displayed the graphical windows logo, and also worked fine in Safe Mode), the problem apparently was that my GeForce 6800 GT decided to (partially) fail on me.  It was actually my lovely wife that made the astute observation that the fact that I had been fairly recently running that card at a scorching hot 100+ degrees C probably hadn’t helped matters!

Note that I don’t recommend that anyone else who encounters this issue (and comes across this blog post via a search) run out and spend $$$ to replace your video card as your first option.  In researching this issue online during the course of the troubleshooting, I did run across some reports from others of this same problem (screen goes blank after displaying the Windows logo during boot) who were able to solve their issue by doing one of the other steps that I tried, such as uninstalling and reinstalling video drivers.

For the time being, I’m in good shape with my workaround.  The lower-end but newer GeForce GT 430 is actually almost as good a video card as the original 6800 GT; and the HTPC can play TV and movies fine with the onboard video.  I guess this gives me something to put on my birthday list for my birthday coming up later this year!

Thursday, June 30, 2011

Fix: Monitor goes black and system hangs while gaming (video card overheat)

Earlier this week, I started having an unpleasant problem with my PC: While playing a game, both monitors connected to my PC would go black (as though the PC had powered off), and the system became unresponsive (the Num Lock light would no longer turn on and off when hitting the Num Lock key).  However, the music the game was playing would keep playing -- indicating that the PC hadn’t totally hung or shut down.  Opening the PC case, I noticed that my video card was very hot to the touch.

I had this happen three times in one night, in all cases happening while I was playing a game.  (It happened originally while playing Torchlight, and then again later while playing Magic: The Gathering 2012, and once again while playing the Avadon: Black Fortress demo.)

Given these symptoms, my original suspicion was an overheating-related issue with my video card (GPU), a XFX NVIDIA GeForce 9800 GT.  (The problem seemed to happen while the video card was under load; the system caused the monitors to go black but sounds kept playing; the video card was hot to the touch; the problem happened intermittently, across multiple applications.)

I posted the problem to SuperUser.com and got a helpful reply from user “Mokubai” confirming that the problem was indeed likely due to a GPU overheat, as well as a link to a very helpful free utility, GPU-Z, which (among other features) provides real-time reporting of the current GPU temperature.

I downloaded and ran GPU-Z.  It reported that the video card temperature with my PC just sitting idle at the Windows desktop was 83 degrees C (hot!).  I put GPU-Z on my secondary monitor and fired up Torchlight (a 3D game) in the primary window; after playing for just a few minutes, GPU-Z reported that my video card was up to a maximum temperature of 101 degrees C (extremely hot!), with the card’s fan running at 100% speed.  Clearly the GPU temperature was almost certainly to blame for the problem of my monitors losing signal and the PC hanging.

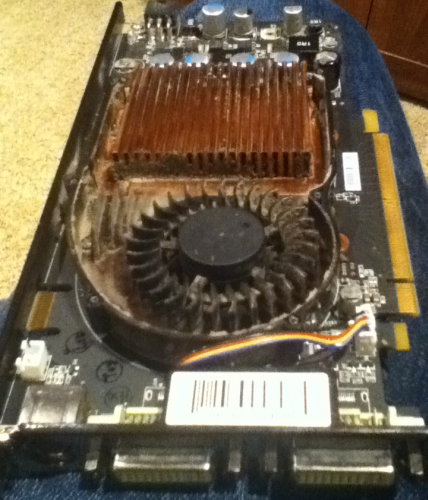
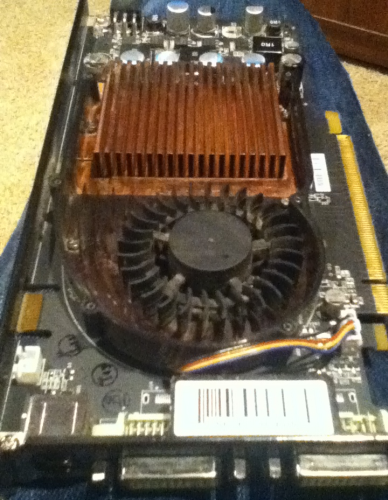
Tonight, I had some time to work on the problem, so I shut down and unplugged the PC and then removed the video card. The card was pretty grimy with dust.

I used a small Phillips screwdriver to remove the six screws holding the “cover” onto the card, and then removed the cover itself. Having done that, I could see that there was a lot of dirty material stuck in the narrow grooves of the heatsink, which was likely obstructing the air flow through the heatsink and preventing the card’s fan from cooling off the heatsink, causing the high temperatures.

I took a pipe cleaner and cleaned all of the gunk out of the heatsink, the fan blades, and the other parts of the card. Much better!

GeForce9800GT_grimyGeForce9800GT_clean

(Images above: Left, XFX GeForce 9800 GT with cover removed, before cleaning; Right, after cleaning.)

Having thoroughly cleaned the video card, I replaced the cover and the screws, reinstalled the card in my PC, and then powered the PC back on.

The result: Much improved temperature readings from GPU-Z!  The GPU now idles at the Windows desktop at 61 degrees C, and hit a maximum temperature of 79 degrees C with an average temperature of around 75 degrees C while playing a session of Torchlight.  The video card’s fan speed never went above 43% while playing the game, indicating that the card itself didn’t think that it was running too hot.

Given that I was originally considering buying a new video card to deal with this problem – a solution that would have run me in the neighborhood of $100 – I’m pretty happy that I was able to fix this issue of the monitors going black while gaming “for free” just by taking a few minutes to give the video card a good cleaning.

Sunday, February 08, 2009

Wii Overheating and Powering Off due to Stuck Fan

The past few weeks, my family has been having a problem with our Nintendo Wii game system at home: After being on and used to play games for an hour or two, the Wii would just shut itself off without warning.  The outer case of the Wii would be hot to the touch after the shut-off.  The obvious diagnosis was that the Wii was overheating, and powering itself off as a safety measure to avoid damaging the processor or other internal components due to the very high temperature.  A Nintendo customer service article on the Wii provides support for this: "The system will shut down if it cannot vent properly to prevent overheating."

After the self-shutoff, the power light of the Wii on the front of its case would be off (not red or yellow, as is normally the case when the Wii is plugged in but powered off).  After the Wii had a few minutes to cool down while powered off, we could get it to power on again by removing and then re-plugging the power cord, but this was obviously only a temporary workaround, since it did nothing to address the root cause of the overheating.

The vents on the back and bottom of the Wii appeared to be clear -- not clogged with dust or otherwise blocked.  However, I couldn't feel any air movement at all when putting my fingers near the vent at the back of the Wii while it was running.  My suspicion was that Wii's internal fan might be jammed with built-up dust, or not running properly for some other reason.  I couldn't determine whether or not this was the case by trying to peer through the vents in the back of the Wii, though.

Reading further on the nintendo.com support site, Nintendo does offer an official repair service, but my Wii (according to the site, after entering my Wii's serial number) is out of warranty; Nintendo wanted US $75 to cover shipping and repair of the out-of-warranty Wii.  I wasn't terribly excited about the prospect of paying such a steep fee to have my not-yet-2-year-old Wii repaired.

I searched around some more, and came across a great article, including pictures, on how to disassemble a Wii, by Ken Hanscom.  Armed with this (thanks Ken!), and with the knowledge that my Wii was out of warranty anyway and therefore there was no warranty to be voided, I decided to set about disassembling my own Wii to be able to get at the fan, and try to diagnose and fix the problem myself.

Tri-wing screwI did need to pick up one additional tool before starting the disassembly -- a "tri-wing" screwdriver, which previously I'd never heard of before.  The Wii and some other consumer electronics devices use tri-wing screws (shown at right) apparently as an attempted security measure to prevent customers from removing the screws and taking apart the devices, as most people don't own one of these screwdrivers, and most hardware stores don't carry them.  However, I was able to pick up a tri-wing screwdriver easily on eBay (searching on tri wing wii) for a grand total of $1.88 including shipping -- almost certainly my most inexpensive online purchase ever that involved something being shipped to me!

Following Ken's instructions, I was able to get the Wii disassembled without too much trouble.  I did run into a couple of problems along the way, though.  First, my micro-size Philips-head screwdriver was having problems getting a grip on the very first set of screws, on the outer Gamecube controller panel of the Wii; however, I ended up being able to use the flathead end of my micro-screwdriver to get those out.

I also ran into a problem with the very last screw to be removed, one of the two tri-wing screws on the bottom of the Wii, in the front panel.  The screw was pretty well stuck in its socket, and I unfortunately managed to strip the screw head using the tri-wing screwdriver, such that I wasn't able to get a grip on the screw with any of my screwdrivers (or with my needle-nose pliers).  Finally, though, as I took a break to put my son Eli to bed, my wife Missy took a turn with the project, and discovered that the casing of the Wii would come apart without actually having to remove that particular screw.  So we were able to complete the disassembly without ever actually getting that screw out.

Wii_parts_bagAs I went along, I ended up putting the screws from each step of the process with their own small plastic bag, to avoid any possibility of getting them confused with one another when I went to reassemble the Wii later.  I also labeled each bag with instructions on where each screw in the bag came from.  This did turn out to make it easy to get the Wii back together at the end of the project.

Finally, the Wii was opened up!  A front/side view:

Wii_naked_front_side

A rear view:

 Wii_naked_rear

The Wii's internal fan is visible at the bottom of the latter image.  The fan actually turned out to be very clean -- no visible built-up dust or grime at all.  However, when I tried turning the fan blade with my finger, the fan was "stuck"; it wouldn't move at all.  When I applied a bit more pressure, though, I could feel the fan suddenly become unstuck, and from that point on, it turned very freely -- even just blowing on the fan would get it spinning easily.

I'm not sure how the fan had gotten stuck in the first place, but apparently, the stuck fan had been the problem!  I tested the Wii by putting the cover back on (although not putting all the screws back in just yet), powering it back up, and playing Rock Band 2 with Missy for about an hour; at the end of our session, the Wii outer cover was still cool to the touch.  (Previously, when the Wii was experiencing the overheating issue, playing for any length of time over a few minutes would cause the Wii's cover to become at least warm to the touch, if not hot.)  We were also to feel some slight air movement at the vent at the back of the Wii while it was on, and we could, listening closely, hear the fan spinning.

I'll certainly keep an eye on the Wii's behavior over the coming days and weeks, but for now, the problem appears to be solved -- and without needing to send the Wii off for repairs for several days/weeks, or pay $75 to Nintendo!  I even managed to learn a few things, and pick up a cool new tool (the tri-wing screwdriver), in the process.

If you have an out-of-warranty Wii that you suspect of having a fan problem similar to the one I've described in this post, I would suggest, as a first step before you consider disassembling it, that you power off the Wii, unplug it, and then use a very narrow screwdriver or similarly-shaped tool to reach through the vent at the back of the Wii and check, by gentle touch using your tool, whether the fan appears to be "stuck" as mine was; and if so, if you are able dislodge it by means of applying gentle pressure.  It would be an easy troubleshooting measure to try, before going to the time and effort of disassembling the Wii.