Although many folks are working remotely these days due to the
Coronavirus pandemic, I've had longer than most to accumulate a nice desk configuration! For the past seven years now, I've worked remotely full-time from my home in Michigan. Here's my current desk setup: My current primary computer, a 2019 16" MacBook Pro, is the screen on the far left. Of the other four monitors, two are connected directly to the MacBook Pro via USB-C cables; the remaining two are connected to my OWC 13 Port Thunderbolt 3 Dock -- that's the component sitting on the desktop behind my keyboard. Delta since 2018
I didn't purchase and assemble this setup overnight! Instead, I've been able to add a part every year or so, building it up over time. This current setup is a nice improvement over my 2018 desktop configuration: The current setup replaces that smaller rightmost monitor with a new portrait orientation monitor; the remaining monitors are the same, just repositioned. Application layout
One reason I've opted for this setup of multiple monitors, as opposed to a single ultra-large monitor -- in addition to having had the ability to slowly purchase and assemble the setup over a period of years -- is that the multi-monitor setup lends itself really nicely to having a particular application always be placed at a particular location. It is a really nice luxury to just be able to just look at a particular screen to get a view of a given application, instead of having to Cmd+Tab or otherwise search through multiple windows to find an application that I'm looking for. Here's how I typically have my applications arranged in this current setup:
Leftmost monitorAs mentioned above, this is the MacBook itself. I have it up on a stand, both to better match the vertical positions of my other monitors, and to get a little bit of desk real estate back to store some small items under the stand.
I typically have my (multi-tab) iTerm2 terminal window running on this monitor, as well as a music player in "mini" mode. I've been using the Mac App Store free app MiniPlay for the latter recently, and it's been working really nicely. In addition to being very similar in size and UI layout to my own "Schneider's Eleven" minimal skin for Windows Media Player that I previously used on a daily basis when I primarily developed on a Windows machine, it seamlessly supports both music player apps that I typically use, Music (formerly iTunes) and Spotify. Left portrait-orientation monitorThis is where I view and write code! As I've blogged previously, I find it really productive to be able to view a long swath of code at once on the tall monitor.
(An exception is when I'm pairing with someone over screen-sharing software, since most of my peers don't have a portrait-orientation monitor. In that case, I typically drag the IDE over to my primary monitor.) Bottom landscape-orientation monitorThis is my "primary monitor". I keep the Mac's Dock on this monitor. I typically have my main web browser window open on this monitor. I'm currently composing this blog post on this monitor. 😁 Top landscape-orientation monitorAs mentioned in my 2018 post (and more visible in my 2018 image above), this monitor is mounted on a pole anchored to my desk via a WALI Extra Tall Monitor Desk Mount. Sometimes I've got nothing happening on this monitor -- when I'm sitting, I have to crane my neck just slightly to look up at it -- but when I need a place to put some secondary window like a database/SQL query window, a code diff, or just another browser window, it's another place I can do so without obscuring any of my other open apps! Right portrait-orientation monitorThis is where I keep my communications windows. The bottom portion is dedicated to Slack while I'm at work. I use the top portion for other communications apps like Messages and WhatsApp.
Phone stand
The small, portrait-orientation "screen" in front of my MacBook is an
iPhone 12. I finally caved and bought myself a new phone, replacing my
venerable iPhone 6S. Despite the lamentable lack of headphone jack technology, I have been otherwise been enjoying the improved battery life and memory on the new device.
The
phone's "stand" is a magnetic wireless charger from Choetech, which
takes advantage of the new MagSafe technology in the 12. (The phone's
position while on the stand doesn't actually obscure any of the area of
the MacBook monitor behind it when I'm sitting at my desk, as it appears
to do in this photo.) The app that you can see running on the phone is my own free App Store app, Desktop Journey. I developed it because I wanted my phone to be doing something useful while sitting and charging in its stand on my desk. I figured an at-a-glance "dashboard" view of the time, my next calendar event, my current Reminders app reminders, the weather, and occasional prompts to stand up and stretch or do a few reps of an exercise would be ideal. After failing to find such an app anywhere on the App Store, I decided to build it myself, and created Desktop Journey! It's a completely free and ad-free app (except for the weather functionality, to help cover my costs for the non-free weather API that I'm using to query global weather data), and collects no personal data. Free Desktop Journey download on the App Store.
Small top-left screen
The last remaining little screen, at the top-left, is a Raspberry Pi running Pi-Hole,
a new addition to my home network, a Christmas gift from my wife
Melissa this past winter. With my local high-speed Internet monopoly
having started imposing a bandwidth cap -- which my family regularly bumps
up against, just through normal everyday usage -- I'm happy to take advantage of
the opportunity to save some bandwidth by declining to send outgoing
telemetry and requests for ads from my local network. WallpaperThe image is of Peyto Lake at Banff National Park, which my family had the good fortune to be able to visit in 2019. Banff -- along with the other nearby national parks in Canada, Jasper and Yoho -- is the most beautiful place I've ever visited. I hope to be able to go back and visit again someday! As MacOS still lacks built-in support for spanning an image across multiple monitors, I used the App Store paid app Multi Monitor Wallpaper to generate this wallpaper.
I currently have my primary work development computer, a 2017 MacBook Pro (15", with Touchbar), set up with a total of five monitors: The MacBook's own display, plus four external monitors.
Five monitors? Isn't that just a bit ridiculous?
Although it may seem like overkill, I have found that this setup is really good for productivity. I'm able to put my most-frequently-used windows each on their own monitor, which is great for avoiding time wasted switching different windows back and forth into the foreground.
It's also great for helping to minimize the situation of making a mental note of something in one window, switching to a different foreground window, and then doing something in that other window with the remembered information; I can just glance back and forth between multiple visible windows instead.
My typical window configuration with this setup:
- Second monitor from right: My primary monitor. Typically I've got a web browser here.
- Second monitor from left (portrait / vertical orientation): My code window. Typically my IDE / code editor (e.g. Visual Studio or RubyMine) goes here. Great for seeing tons of code at once! Also excellent for reviewing long documents, such as XSDs or other documentation.
- Leftmost monitor: Secondary browser or document window. I put terminal windows here. I also put my mini-mode iTunes music player in the corner.
- Rightmost monitor: Communication / chat. I typically have my team's Slack window open here.
- Top monitor: I keep a video conference window to my team's office in San Diego open here during the hours that they are working, so they can see and talk to me, and vice-versa!
What's the hardware?
Computer
MacBook Pro, 2017, 15".
As far as ports go, this computer has 4 USB-C ports, plus a 3.5mm headphone jack -- and that's it! Power, video, network -- everything is done through the USB-C ports.
I have the laptop sitting on a 3M LX500 Laptop Stand
to align its screen a little better vertically with the other
displays. I like this stand because there's a nice empty space under
the stand (which is the not the case with many stands), which is nice
for a little extra physical storage space on the desk top.
USB-C to 17-port adapter
OWC 13 Port Thunderbolt 3 Dock.
This is the main device that allows me to connect so many devices to my MacBook, including two of the four external monitors, as well as to provide power to the MacBook, all through a single one of the MacBook's USB-C ports.
Primary external monitor (second from right)
Dell U2312HM. 1920x1080 resolution.
Connected via: MacBook USB-C port → CableCreation brand USB-C to DVI adapter → DVI cable → Monitor DVI port
Portrait mode (vertical) monitor
Dell U2412M. 1920x1200 resolution.
Connected via: OWC Thunderbolt Dock → BlueRigger brand Mini Displayport to DVI cable → Monitor DVI port
The stand that comes with the monitor supports rotation, so it was very easy to get it set up in portrait mode.
The bump to 1200 resolution in the narrow dimension (instead of 1080) is nice, as it gives the monitor a little extra horizontal room in portrait mode.
Modern versions of MacOS and Windows both have excellent support for "rotating" the output for a given monitor to support portrait orientation -- I've successfully used this monitor in portrait orientation with both OS X and Windows.
Rightmost (tertiary, 4:3) monitor
Dell E196FP. 1280x1024 resolution.
Connected via: OWC Thunderbolt Dock → Agatha brand USB-C to VGA Cable → Monitor VGA port
I wouldn't actually recommend this specific model of monitor anymore, because it only supports a VGA cable connection! Newer connection types such as DVI, HDMI, or DisplayPort will generally provide a sharper screen image. However, even with just the VGA connection, in practice I don't notice any bothersome blurriness on this display.
Top monitor: Dell S2415H. 1920x1080 resolution with integrated speakers.
Connected via: MacBook USB-C port → Apple brand USB-C Digital AV Multiport Adapter → HDMI cable → Monitor HDMI port
Stand: WALI brand Extra Tall Universal Single LCD Monitor Fully Adjustable Desk Mount
How painful is docking / undocking?
It's not bad at all, actually; there are only 3 USB-C cables to plug or unplug when I connect or disconnect the MacBook laptop from the setup: The one USB-C cable for the OWC Thunderbolt Dock, plus the two additional monitor adapter dongles.
It's not quite as nice of an undock experience as when I used this same set of monitors and other devices with my Lenovo Windows laptop -- which involved unplugging just a single HDMI cable from the laptop itself, and removing the laptop from the physical dock -- but it's still very acceptable!
What's with all of the Dell brand monitors?
Experience has taught me that some non-Apple monitors just don't play nice with MacBooks. The typical symptom I've seen is that I'll connect a monitor to the MacBook, and simply nothing will happen: The Mac will act as though nothing new was connected. Even the System Preferences → Displays → (hold Option button) → Detect Displays feature wouldn't help.
I don't know of any reliable way to tell whether a particular non-Apple monitor is going to work with a Mac other than actually trying it.
I've had good luck with Dell monitors working with the MacBook, though, so my current plan is to continue going with the "Dell" strategy until something changes -- that is, until I run across a Dell monitor that doesn't work with the Mac!
So why the detailed write-up?
Actually getting this to work was the end result of a lot of trial and error. I tried several times connecting these and other monitors to the MacBook in ways that resulted in things not working -- almost always manifesting itself as the MacBook acting as though one or more of the connected external monitors didn't actually exist at all, as I noted earlier.
Some specific things that I remember trying when I was getting this all set up that didn't work:
- Trying to connect more than two external monitors via the OWC Thunderbolt dock. I was only ever able to get a maximum of two external monitors working through that dock; any further number of monitors I tried just wouldn't work.
- Certain other adapter and cable brands. In particular, whereas the CableCreation brand USB-C to DVI adapter (which has only 3.5 stars on Amazon as of this writing) worked for me, a similar Belinda brand USB-C to DVI adapter did not work for me -- even though it specifically listed support for MacBook -- and I ended up returning it.
- In general, I had a lot better luck getting "non-handshaking" port types (DVI, VGA) to work than "handshaking" ports (HDMI, DisplayPort). I had several different failures trying to get the two primary Dell monitors, both of which support both DisplayPort and DVI connections, to work with the MacBook via their DisplayPort connections, before I did get them working via their DVI ports. (Both Dell monitors did work just fine with my Lenovo Windows laptop via either one of their ports.)
Hopefully this post will prove of some value to anyone who might be trying to get a similar multi-monitor MacBook setup working; or to me, in the event that I need to try and recreate this setup in the future!
Wallpaper shout-outs
OS X does not currently have native support for spanning a single image across multiple monitors as the desktop wallpaper (like Windows does). The great $3 solution that I used to create the spanned image of the Enterprise-D as shown in the photo above is the Multi Monitor Wallpaper app, available on the MacOS App Store.
Multi Monitor Wallpaper shows you an outline of your combined monitor
layout, and allows you to stretch / zoom / reposition your selected
image across the monitors. It then automatically handles cutting up the image and setting it as the background image for each monitor. I have no affiliation with the app; I'm just a fan!
As for the excellent high-resolution image of the Enterprise-D itself, unfortunately I'm not sure whom to credit. I grabbed the image over a year ago via a Google image search, and I can't find the same image now when I search. If anyone knows where this image is from, let me know, and I'll gladly provide credit!
On the MacBook Pro (2017, with Touchbar) that I currently use as my primary development computer at work, after I "docked" the computer (reconnected all external monitors and devices) this morning, my monitors were in the wrong order.
Further, the display on one of the external monitors -- a Dell 2415H, connected via USB-C port → USB-C to HDMI adapter → HDMI cable → HDMI port -- had an extremely blurry display. That monitor also now had "overscan" of about a centimeter; that is, the image extended past the viewable area of the screen in all directions (so that I could only see the bottom edge of the menu bar at the top of the screen).
Fixing the display order was a simple matter of going into System Preferences → Displays → Arrangement, and dragging the monitors back into the proper order.
However, it took a little longer to figure out a solution to the blurriness issue. In the System Preferences → Displays window for the blurry monitor, the Resolution radio button was set to "Default for display" as usual. When I changed it to Scaled, the available values were "1080i" (selected), and 720p.
Changing the setting to 720p caused the display to be sharp again, but everything on that monitor ended up being sized way too large. (Plus, I then was only presumably getting 720 pixels of vertical resolution, instead of the 1920x1080 of which the monitor was capable.)
The solution turned out to be to close the Displays windows, unplug and replug that monitor's HDMI cable, and then open System Preferences → Displays again. After doing that, the Displays window → Color tab → Resolution (scaled) selection for the blurry monitor now displayed two additional options which weren't there before: "1080p" and "1600 x 900".
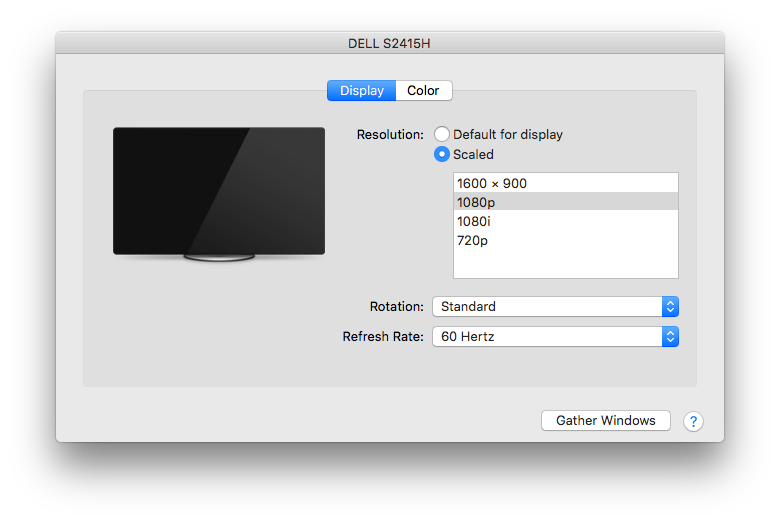
Changing the selection to the now-available "1080p" fixed the problem: All text and images on the monitor became nice and sharp again, and the overscan went away.
On my development machine, I have an external monitor physically set up in vertical / portrait orientation, instead of the “default” horizontal / landscape orientation. My IDE (code editor) window always resides on that monitor. Instead of writing 1000 words to explain why this works great, I’ll let a pair of pictures do most of the explaining for me. Here’s a Visual Studio window (with the code for my open-source “Schneider’s Eleven” minimalist skin for Windows Media Player) open on my horizontal-orientation monitor at 1920x1080 resolution: 
Look at all that wasted whitespace on the right half of the main code pane! (This code was admittedly developed using fairly short line lengths, but the same wasted space effect probably still applies to at least some extent in the majority of projects out there.) Now, here’s the exact same Visual Studio window moved over to my vertical-orientation 1200x1920 monitor: 
Much less wasted whitespace! And almost 100 lines of code are visible on the screen at the same time, making it much easier to visually scan a large chunk of source code without having to scroll around. Having developed code this way in both Windows and Mac OS environments, I’d never go back! Rotating a particular monitor 90 degrees is an easy configuration change in the OS display properties (in Windows, Mac OS, and evidently in Linux as well), so if your physical display stand supports it, I’d encourage giving it a try and seeing how it works for you!
I’ve been running three monitors on my PC at work for a while now, and it’s been working great for me. Multiple monitors works great for running business applications and/or doing software development; for example, I typically run my programming environment maximized on my primary monitor, run most the programming environment’s secondary windows (e.g. project file list, search results, list of compiler warnings/errors, etc.) on the second monitor, and the application’s UI or other reference material on the third monitor. I’m able to see everything I need to see at once without shuffling windows around. PC Games As multiple monitors on PCs continue to gain more market penetration, it would be nice to see more PC games join business applications and take advantage of the potential availability of multiple displays. A game’s main view of the game world could go on the primary monitor, and secondary information could go on a second monitor, freeing the entire screen area of the primary monitor to show the game world. For example: - In MMORPGs such as World of Warcraft, the display can become pretty “cluttered” with ability toolbars, party status display, mini-map/radar, active buffs/debuffs, and more. All of that could (optionally) be moved onto a secondary monitor, freeing the entire area of the primary monitor to show the game world.
- In RTS games such as the classic Starcraft, the selected unit(s) and their information, “order” buttons (move, attack, stop, etc.), and mini-map could be moved onto the second monitor.
- In traditional RPGs, secondary data such as inventory screens, skill/spell lists, character statistics display, and so forth could be shown on the second monitor, again freeing the entire area of the primary monitor to show the game world at all times.
Console Games It would also be nice if future console systems (i.e. successors of the current generation’s Wii, Xbox 360, and Playstation 3) would (optionally) support hook-up to multiple television sets in the future. In addition to the getting the same benefits that would be realized by PC games, this might also help with situations where there are multiple players playing simultaneously on the same local console system. Today, local multiplayer is typically accomplished via split screen; in the future, one or more players’ view could be moved onto the second screen. If a future Rock Band or Guitar Hero game supported the addition of a keyboard (piano) part or otherwise supported more players playing together beyond the 4 supported today, multiple TVs could help with the problem that would otherwise be encountered in trying to squeeze 5+ players’ parts onto the same screen! Handheld Games Obviously, the one gaming system that is way out ahead of the curve as far as multiple monitor support goes is the Nintendo DS. With two screens built into the hardware, all games on the platform can be designed to fully take advantage of the availability of two screens. Although I don’t own a DS, I’ve had a chance to briefly borrow one owned by my nephews on a couple of occasions. It is really cool in a game like Zelda to be able to see both the primary game world and the overhead map view (while in a dungeon) at all times. TV - Sports Multiple screen support would also be really cool in the future for TV – particularly for sports broadcasts. In my case, I’m a big fan of Michigan Football. Instead of watching games on just a single screen (where the display tends to focus in on the quarterback or whomever has the ball, to the exclusion of the rest of the field), it would be amazing to have a second screen showing what the downfield receivers are doing (or other action away from the ball appropriate to the play), and a third screen dedicated to showing real-time stats at all times. The score and “ticker” could also be shown on the third screen, freeing the entire area of the main screen to show the game action. Obviously, support for people watching the game on just a single TV (I’d likely be among them, at least for now!) would have to be maintained as well. Perhaps an “all in one” game broadcast (essentially what we have today) could be carried on a particular channel; the “multiple screens” version of the game could be carried on a separate set of channels. This kind of multiple screen support for sports broadcasts, particularly combined with support for single-TV viewers, would work out to quite a few channels being dedicated to sports broadcasts! Still, with the proliferation of channels available even today via digital cable or satellite broadcasts, this kind of thing might be possible in the not-too-far future. Put those old displays to use! This would also give people something to do with “old” PC monitors and TVs as they gradually get replaced over time with HD versions: Put the old displays to good use as secondary information displays for games and TV! One of the 3 monitors that I have at work is an old monitor that would be sitting on a shelf at home (or worse, in a landfill somewhere) if I didn’t have a use for it as the third monitor on my work machine. So, PC game developers, console hardware companies, and sports broadcasters: Go forth and make it so. :-)
Back in September, I set up about researching how I might be able to add a 3rd monitor to my laptop PC at work, a Lenovo (IBM) ThinkPad T60. The built-in video card on the laptop PC, an ATI Mobility Radeon X1300, supports only dual monitors. The card can run the built-in laptop LCD display plus one external monitor, or two external monitors (via the additional DVI port on the machine's docking station), but not two external monitors and the built-in LCD at the same time. Since simply opening up the case and popping an additional video card into a free PCI-e or PCI slot isn't an option with this laptop machine like it would be with a desktop machine, I considered several alternative solutions: Docking Station PCI Card I first considered purchasing a new docking station, the Thinkpad Advanced Dock, which supports adding a standard PCI-e card directly to the dock; then plugging a PCI-e video card into the dock, and running the 3rd monitor off of that. However, this solution was cost-prohibitive (around US $380 for the dock -- not including the cost of a PCI-e video card). I also ran across multiple reports from Thinkpad owners trying and failing to get this solution working on the official Lenovo forums (particularly in this thread). PCMCIA Video Card Next, I looked into the possibility of getting a PCMCIA video card for my laptop's free PCMCIA slot, such as the VillageTronic VTBook. However, I was somewhat concerned that the card might "stick out" of the side of my laptop, making the laptop a hassle to carry around with the card installed. I was also concerned about potential difficulties with docking/undocking the machine (which I do a few times a week) while using the card. Finally, the VTBook solution was also somewhat cost-prohibitive (around US $250). My solution: USB Video Card The solution that I finally settled on was to purchase a USB 2.0 video card. This is a self-enclosed video card with a USB connection on one end to connect to the PC, and a DVI port on the other for connecting a monitor. The specific model I picked up was an IOGEAR model GUC2020DW6 external video card. The price was right (particularly compared to the other available laptop multiple-monitor solutions I considered): the IOGEAR card was on sale for about US $80 when I purchased it back in early October 2008 (and it's even lower now, down to US $68 on Amazon, as I write this post). I've had the card for just about two months now, and it's been working great -- better than I expected! I had been concerned that there might be noticeable display "lag" on the monitor connected by the USB video card, but in practice, there's no noticeable difference when working on the USB-connected monitor or working with one of the others. The only time that I notice the difference is when dragging a window around on the USB-connected monitor; there is just a bit of "lag" as the window moves around the screen. Here's the card, connected, behind my PC, along with a penny to help show the size of the device (apologies for the low quality cellphone-cam photo): 
And here's the 3-monitor setup at my desk at work, using the external USB video card to drive one of the external monitors: 
USB video cards do have known limitations with displaying very rapidly-updating content (e.g. movies, 3D games) due to the limited throughput of USB 2.0, so I wouldn't purchase one of these cards to use on a gaming machine. However, I knew that I'd only be using this monitor for business use: Writing code, viewing documents, doing email, surfing the web; that type of thing. Also, in the event that I do want to view some rapidly-changing content that the adapter can't handle well, I can always just put that content on one of my other monitors. Footnote I got some great help in my research on this issue by posing the question of ways to add a 3rd monitor to a laptop over on StackOverflow, a fairly new community-run site for asking and answering programming and programming-related questions.
On Windows, it is possible to get into a situation where one or more application windows are positioned entirely outside of the bounds of the viewable area of the monitor. This can sometimes happen with a machine in a multi-monitor setup where one of the monitors is disconnected; an application window that is in the minimized state at the time that a monitor is unplugged can, when the window is restored (un-minimized), be restored to a position somewhere off the screen, in what was the viewable area of the disconnected monitor.
Here's one way to "rescue" such an off-screen window and bring it back onto the active monitor:
- Make the off-screen window the active window by clicking on its icon in the Windows Taskbar.
- Press Alt+Space, and then press the M key. This will activate the window's system menu, and put the window into "move mode."
- Press any arrow key once. This will put Windows into a mode where moving your mouse will drag the active window around the desktop (even without holding in a mouse button).
- Move the mouse around until the window reappears on the active monitor.
- Left-click once with the mouse (anywhere) to exit "move mode."
That's it! This works on Windows XP, Windows Vista, and Windows 7. I hope this helps!
|
|


 Posts
Posts

