TimeSnapper for Mac has been updated to allow a custom directory to be selected for your captured screen images! If you're not already familiar with TimeSnapper, it's a utility that runs in the background on your Mac or PC and saves an image of your screen(s) (or just the active application window) every few seconds. This can be highly useful when, to take a few examples: - A piece of text you were composing got lost because your browser crashed, or because a web form submit failed. (Retrieve the text out of your screenshot history!)
- You want to search up information about a specific error message that you encountered a few minutes ago, for which you don't remember the exact wording. (Again, it'll be waiting for you in your screenshot history!)
- You want to remember what all you were working on the afternoon of two days ago. (Click and drag across the TimeSnapper timeline UI to pan through your screenshot history!)
Previously, the Mac version of TimeSnapper saved your screen images to subfolders of a particular "sandboxed" directory that the TimeSnapper app was by default permitted to access. This worked, but the target folder was in a fairly deep location on the MacOS filesystem, and thus was inconvenient to access by any means other than the "View in Finder" button in TimeSnapper's Preferences window. Now, starting in version 1.1.0, TimeSnapper for Mac has been enhanced to use security-scoped bookmarks to allow you to choose any folder on your local computer for TimeSnapper to use to save its screen images. To use the new feature, after updating your copy of TimeSnapper to the latest version via the Mac App Store, click on the TimeSnapper icon in your Mac's top menu bar, then select Preferences, then the Auto Cleanup tab in the Preferences window. You'll see a "Change folder..." button in that window. If you aren't already using TimeSnapper, take a look at the reviews and ratings (4.8 out of 5 stars as of today!) of TimeSnapper on the Mac App Store, and treat your personal productivity to a lifetime license for a quite reasonably low price!
Problem: Users on my wifi network can't click on ad links in Google Search results because those links redirect to the ad.doubleclick.net domain, which is blocked by my Pi-hole. The user ends up on a page with this error message: Unable to connect. An error occurred during a connection to ad.doubleclick.net. This happens on Firefox (as of the time of this post, January 2025) because Google is doing something a little bit sneaky: If you mouse over a hyperlink in a sponsored ad in a set of Google search results, it appears to be a normal hyperlink. However, as soon as you click on that link, Google swaps out the target of that link to be a different one than the one that was displayed -- and that's where the link ends up taking you. (In more technical terms: Google appears to be using JavaScript's onClick event to cancel the navigation to the original href; then replaces the original href with the new href; and then proceeds to navigate to that new destination.)
For example, one of the results when I searched Google just now for "new wireless service" was https://www.verizon.com/plans/unlimited. However, clicking on that link actually navigated me to an URL starting with https://ad.doubleclick.net/searchads/link/click?lid=... . You can actually see the swapped-in hyperlink by using the browser's back button to return to the Google search results page, and mousing over the clicked hyperlink again. You'll see that preview of the destination URL for that same link has now changed! (The same happens if you right-click on the target link, then cancel the right-click context menu, and hover over the link again.) My family members from time to time actually want to click on a sponsored Google search result, and have the navigation work properly. However, I don't want to whitelist the entire "ad.doubleclick.net" domain at my Pi-hole, since that would likely result in a lot more distracting ads being rendered as we use the web. I searched for a Firefox add-on which would prevent hyperlink URL destinations being changed from the preview URL that was shown prior to clicking on them, but couldn't find one that seemed trustworthy. (I do already run EFF's Privacy Badger add-on, which purports to include this particular functionality; but for whatever reason, it isn't working for me in Firefox as of the time of this post. Possibly Google has recently updated the mechanism that they use to perform their URL-swapping in Firefox; and Privacy Badger hasn't yet been correspondingly updated.)
Workaround / SolutionTo my surprise, Google doesn't seem to perform their URL replacement when the search link is activated by the Return key, instead of by a click! Therefore, a crude-but-effective workaround is as follows, when looking at a page of Google search results: - Hit the Tab key until the desired link has the focus.
- (Alternatively, double-click a word of text near the target link to select it; then press Tab and/or Shift-Tab from there until the desired link has the focus.)
- Press Return to activate the link.
This workaround does have the advantage of not needing any browser add-on to work!
When doing this, Google (apparently) doesn't have any JavaScript in place to hijack the link destination; the client browser navigates directly to the actual URL shown in the browser's preview, without being redirected through ad.doubleclick.net (or any other domain).
As part of one of my Advent of Code 2024 solutions, I wrote a small program that included a fairly deep level of recursion. When run on my Mac, using Ruby 2.7.2, the program failed to run to completion, generating a stack trace like this (shown in part for brevity): Traceback (most recent call last):
3304: from day-16/day-16-part-1-dfs.rb:125:in `<main>'
3303: from day-16/day-16-part-1-dfs.rb:86:in `explore_map'
3302: from day-16/day-16-part-1-dfs.rb:86:in `each'
3301: from day-16/day-16-part-1-dfs.rb:96:in `block in explore_map'
3300: from day-16/day-16-part-1-dfs.rb:86:in `explore_map'
... 3292 levels...
day-16/day-16-part-1-dfs.rb:87:in `key?': stack level too deep (SystemStackError)
I could have fixed this by rewriting my recursive function to use a queue instead, but I wanted to see if I could change my runtime configuration to get my program to run as-is; and I was able to do so! I ended up needing to change TWO things to get the program to run successfully. First, I needed to increase the system stack size limit for my Mac, for the current terminal session. For my particular program, I needed to set it near my machine's max: ulimit -s 65520 (The default stack size limit had been 8176.) Making just that change allowed my program (when run from that terminal session -- not from my IDE) to reach a deeper count of recursions; but it still failed with a similar error: Traceback (most recent call last):
10920: from day-16/day-16-part-1-dfs.rb:125:in `<main>'
10919: from day-16/day-16-part-1-dfs.rb:86:in `explore_map'
10918: from day-16/day-16-part-1-dfs.rb:86:in `each'
10917: from day-16/day-16-part-1-dfs.rb:96:in `block in explore_map'
10916: from day-16/day-16-part-1-dfs.rb:86:in `explore_map'
... 10908 levels...
day-16/day-16-part-1-dfs.rb:32:in `hash': stack level too deep (SystemStackError)
Second, I needed to set an environment variable to increase the Ruby VM's maximum allowed stack size. For this "toy" program, I just picked an arbitrary very large value: export RUBY_THREAD_VM_STACK_SIZE=50000000 With that change also in place, my program was able to successfully run to completion!
I did end up refactoring my solution from using a depth-first search to a breadth-first search, which, in addition to not needing to deal with Ruby's limit on recursion stack depth, was a lot more efficient for solving that particular problem. I wanted to make a note on what I did, though, so that if I ever face a situation again where I'm bumping up against a Ruby stack depth limit (and a solution other than increasing the limit isn't called for), then I'll be able to remember what I did this last time!
Although many folks are working remotely these days due to the
Coronavirus pandemic, I've had longer than most to accumulate a nice desk configuration! For the past seven years now, I've worked remotely full-time from my home in Michigan. Here's my current desk setup: My current primary computer, a 2019 16" MacBook Pro, is the screen on the far left. Of the other four monitors, two are connected directly to the MacBook Pro via USB-C cables; the remaining two are connected to my OWC 13 Port Thunderbolt 3 Dock -- that's the component sitting on the desktop behind my keyboard. Delta since 2018
I didn't purchase and assemble this setup overnight! Instead, I've been able to add a part every year or so, building it up over time. This current setup is a nice improvement over my 2018 desktop configuration: The current setup replaces that smaller rightmost monitor with a new portrait orientation monitor; the remaining monitors are the same, just repositioned. Application layout
One reason I've opted for this setup of multiple monitors, as opposed to a single ultra-large monitor -- in addition to having had the ability to slowly purchase and assemble the setup over a period of years -- is that the multi-monitor setup lends itself really nicely to having a particular application always be placed at a particular location. It is a really nice luxury to just be able to just look at a particular screen to get a view of a given application, instead of having to Cmd+Tab or otherwise search through multiple windows to find an application that I'm looking for. Here's how I typically have my applications arranged in this current setup:
Leftmost monitorAs mentioned above, this is the MacBook itself. I have it up on a stand, both to better match the vertical positions of my other monitors, and to get a little bit of desk real estate back to store some small items under the stand.
I typically have my (multi-tab) iTerm2 terminal window running on this monitor, as well as a music player in "mini" mode. I've been using the Mac App Store free app MiniPlay for the latter recently, and it's been working really nicely. In addition to being very similar in size and UI layout to my own "Schneider's Eleven" minimal skin for Windows Media Player that I previously used on a daily basis when I primarily developed on a Windows machine, it seamlessly supports both music player apps that I typically use, Music (formerly iTunes) and Spotify. Left portrait-orientation monitorThis is where I view and write code! As I've blogged previously, I find it really productive to be able to view a long swath of code at once on the tall monitor.
(An exception is when I'm pairing with someone over screen-sharing software, since most of my peers don't have a portrait-orientation monitor. In that case, I typically drag the IDE over to my primary monitor.) Bottom landscape-orientation monitorThis is my "primary monitor". I keep the Mac's Dock on this monitor. I typically have my main web browser window open on this monitor. I'm currently composing this blog post on this monitor. 😁 Top landscape-orientation monitorAs mentioned in my 2018 post (and more visible in my 2018 image above), this monitor is mounted on a pole anchored to my desk via a WALI Extra Tall Monitor Desk Mount. Sometimes I've got nothing happening on this monitor -- when I'm sitting, I have to crane my neck just slightly to look up at it -- but when I need a place to put some secondary window like a database/SQL query window, a code diff, or just another browser window, it's another place I can do so without obscuring any of my other open apps! Right portrait-orientation monitorThis is where I keep my communications windows. The bottom portion is dedicated to Slack while I'm at work. I use the top portion for other communications apps like Messages and WhatsApp.
Phone stand
The small, portrait-orientation "screen" in front of my MacBook is an
iPhone 12. I finally caved and bought myself a new phone, replacing my
venerable iPhone 6S. Despite the lamentable lack of headphone jack technology, I have been otherwise been enjoying the improved battery life and memory on the new device.
The
phone's "stand" is a magnetic wireless charger from Choetech, which
takes advantage of the new MagSafe technology in the 12. (The phone's
position while on the stand doesn't actually obscure any of the area of
the MacBook monitor behind it when I'm sitting at my desk, as it appears
to do in this photo.) The app that you can see running on the phone is my own free App Store app, Desktop Journey. I developed it because I wanted my phone to be doing something useful while sitting and charging in its stand on my desk. I figured an at-a-glance "dashboard" view of the time, my next calendar event, my current Reminders app reminders, the weather, and occasional prompts to stand up and stretch or do a few reps of an exercise would be ideal. After failing to find such an app anywhere on the App Store, I decided to build it myself, and created Desktop Journey! It's a completely free and ad-free app (except for the weather functionality, to help cover my costs for the non-free weather API that I'm using to query global weather data), and collects no personal data. Free Desktop Journey download on the App Store.
Small top-left screen
The last remaining little screen, at the top-left, is a Raspberry Pi running Pi-Hole,
a new addition to my home network, a Christmas gift from my wife
Melissa this past winter. With my local high-speed Internet monopoly
having started imposing a bandwidth cap -- which my family regularly bumps
up against, just through normal everyday usage -- I'm happy to take advantage of
the opportunity to save some bandwidth by declining to send outgoing
telemetry and requests for ads from my local network. WallpaperThe image is of Peyto Lake at Banff National Park, which my family had the good fortune to be able to visit in 2019. Banff -- along with the other nearby national parks in Canada, Jasper and Yoho -- is the most beautiful place I've ever visited. I hope to be able to go back and visit again someday! As MacOS still lacks built-in support for spanning an image across multiple monitors, I used the App Store paid app Multi Monitor Wallpaper to generate this wallpaper.
Since all the way back in 2008, during most of which Windows was my daily-use operating system for work and hobbies, I used, and was a big fan of, a utility called TimeSnapper. Billing itself as "The Automatic Screenshot Journal", TimeSnapper quietly would run in the system tray of my Windows computer, taking a screenshot of whatever application I was actively using every few seconds. TimeSnapper additionally came with a "Play Your Day Like a Movie" feature, where I could watch my entire day of work, or jump directly to the screenshot of any point in time of the day.
TimeSnapper saved me on multiple occasions where I would have otherwise lost work. A couple of examples of this:
- I'd been typing some long-form text into a form on a web page, only to have the browser crash and lose all of my work. Without TimeSnapper's most recent screenshot of my work-in-progress post, I'd have had to recreate the text from scratch, instead of simply having to retype it. (See my 2014 tweet about the incident!)
- I'd run into a problem with a program, where it displayed a particular error message in a dialog. A few minutes later, I wanted to Google the error to try to find a solution. I couldn't remember the exact text of the error in order to type it into Google... but TimeSnapper had captured an image of the error dialog, so there was no problem!
In early 2017, taking on an assignment with a new product at work, I switched to working on a Mac, making my primary daily-use operating system macOS instead of Windows. One of the first things I did, naturally, was to look for macOS equivalents of the essential utilities that I had come to rely on for software development and other work on Windows.
Although I was able to find many useful equivalents for utilities such as clipboard history saving, I wasn't able to find anything like TimeSnapper. Seemingly at least once every week after switching to Mac, I'd run into some situation like the ones described above where I wished I could look back in time to retrieve some important piece of information that I know I had on screen a short time earlier, but was now lost.
Fast-forward to the present day, and I'm super excited to announce: The official release of TimeSnapper for Mac is now available!
Why am I able to announce this? Because, in partnership with the original developers of TimeSnapper for Windows, Leon Bambrick and Atli Björgvin Oddsson, I am the developer of TimeSnapper for Mac!
By late 2017, I was frustrated enough with not having TimeSnapper or a similar utility in my day-to-day work that I reached out to Leon, asking if there was any news around a Mac release of TimeSnapper. Leon replied that there was not; but after some conversation, he offered me the opportunity to develop it!
After a long journey, starting with me not even knowing whether making a macOS version of TimeSnapper would be at all possible -- for example, whether macOS even had operating system hooks allowing an application to perform screen captures -- TimeSnapper for Mac is now complete, and is available on Apple's Mac Store as of today!
Some of the major milestones in TimeSnapper for Mac's development, using Objective-C and Xcode, included:
- Getting a simple, UI-less program working which successfully managed to take and save to disk a screen capture of the Mac desktop.
- Making the program "wake up" at regular intervals to take screen shots -- and continue to do so even if the computer is put to sleep.
- The ability to pause, and later resume, the capture of screen shots on command.
- Adding an option to reduce screen shots in size and/or quality before saving them to disk -- and adding a Preferences window for the user to control these options, as well as the delay between screenshots and the image format (.jpg or .png).

- An option to capture just the foreground application window, the entire monitor where the application is running, or all monitors (on a multi-monitor system). Due to the way the relevant macOS hooks work, just successfully identifying the foreground-most window was surprisingly challenging, but after lots of effort and testing, TimeSnapper is able to get it right for almost all applications.
- Adding a "preview image" of a screen shot to the Preferences window with the selected size and quality options applied, as well as an estimate for how large the screen shot would be on disk with the selected options.
- Adding "auto cleanup" of old screen shots to save disk space, along with Preferences window options for the user to specify a maximum age of saved screen shots, and/or maximum disk utilization for all screen shots.
- An option to open a new Finder window, navigated to the folder where TimeSnapper saves its images.
- Getting TimeSnapper to optionally start automatically after reboots. (This functionality on Mac was almost shockingly difficult to implement relative to what I expected, requiring quite a bit of code along with a whole "sub-application".)
- Getting TimeSnapper to appear as an icon and menu in the Mac's
top Menu Bar, and to display its larger Dock icon only when one of its
windows is open.
- An initial "Play Your Day Like a Movie" window, displaying one of the saved screen shots.
- Adding a timeline to the Play Your Day window, displaying a range of hours corresponding to the earliest and latest screenshot captured for a selected day, and a tick mark on the timeline for the time of every individual screenshot taken.
- Getting a mouse click -- and later, drag -- on the timeline to change the image display to the image taken nearest to the clicked time.
- Adding the eponymous ability for the window to play the selected
day's screenshots like a movie, with playback controls for
starting/pausing the playback and increasing or decreasing the playback
speed.

- Handling local time changes properly, so that "going back in time" by carrying the Mac across a time zone boundary from east to west, or at the end of Daylight Saving Time, doesn't cause screen shots to appear out-of-order in the Play Your Day window, or to potentially overwrite one another.
- Lots more polish and bug squashing!
It's been a genuine pleasure over the past few months, in the later phases of development, to once again have had TimeSnapper running on my daily-use computer -- now, a Mac -- affording me the ability to easily peer back in time and see exactly what text or activity I previously had on my screen!
Check out TimeSnapper on the Mac App Store! If you like it, I'd love it if you'd leave a nice review, or just drop me a line (here in the comments, or find me on Twitter) and let me know what you think!
I've recently been fighting an intermittent issue in a specific Ruby on Rails app running on a Phusion Passenger web server on my local macOS development machine: HTTP requests to the app would intermittently return the error "Incomplete response received from application" wrapped in a simple h2 element, instead of the desired resource.
When this occurred, I'd also see a message like the following appear in the Phusion Passenger web server log:
App 6510 output: [ 2019-06-27 12:07:49.0318 6510/0x00007f83639eb6f8(HTTP helper worker) utils.rb ]: *** Exception Errno::EBADF (Bad file descriptor) (process 6510, thread 0x00007f83639eb6f8(HTTP helper worker))
Oddly, no one else working on this application saw these errors while running the app on their machines, even though as far as we could tell, we were all running pretty much the exact same environment.
The workaround
I found that I could get this issue to stop manifesting on my machine by appending the following parameter to my passenger server start-up command:
--spawn-method direct
This resulted in the complete Passenger start command for the application looking like:
bundle exec passenger start --port 3000 --max-pool-size 4 --min-instances 4 --spawn-method direct
Explanation
The key to coming up with this workaround was an article on the Phusion Passenger website: Spawn methods explained (for Ruby developers).
That article talks about how, in order to save memory and improve start-up time, Passenger uses a "spawn method" setting of "smart" for Ruby applications by default. That setting accomplishes that by having multiple server processes share certain objects in memory.
A caveat of the "smart" spawn mode noted by the article is unintentional file descriptor sharing. This caught my attention: Research I'd done on the "EBADF (Bad file descriptor)" error noted that it could be caused when a file descriptor -- that is, a handle pointing to a resource like a local file or a network socket -- is closed, but then accessed again after being closed. If such a handle was being unintentionally shared between web server processes, it does seem entirely plausible that one process could close a handle, then the other process could try to use it for something.
It seemed logical that configuring Passenger to not share objects between processes, via using the "direct" spawn mode setting instead of the "smart" setting, would avoid this. Sure enough, using the "direct" setting did immediately stop the "Incomplete response from application" errors I was seeing in my local environment. Additionally, running the app on my local machine (with myself as the only user), I didn't observe any meaningful degradation in app performance.
What I'm still unsure about at this point is exactly what specific handle was being incorrectly shared between processes, and why no one else working on this application was having the same error that I was manifest in their environments. Thus, I'm considering this a "workaround" rather than a "solution" for the time being. (And I'm not committing a change to have the app use the "direct" spawn mode in any environment other than my own.)
Other solutions attempted
Prior to finding the workaround, as all signs pointed to this being some kind of environmental issue with my local machine, I tried to "fix" my environment in quite a few different ways:
- Use a different client browser
- Restart the Passenger web server
- Reboot
- Reinstall Ruby 2.6.3
- Revert to an older Ruby version (2.5.3) using rvm (and uninstall 2.6.3)
- Reinstall gems via bundle install --force
- Clone a fresh copy of the Rails application code itself from the remote repository
- Run the application on a different port (other than 3000)
- Update the database (mySQL) to the latest patch version
- Increase the limit of open files per process via ulimit -n 8192
- Increase the database pool size in database.yml
None of those attempted fixes made a difference; the "Incomplete response received from application" response to HTTP requests, and the "Errno::EBADF (Bad file descriptor)" in the server log continued to manifest.
I had initially suspected the Ruby 2.6.3 upgrade to have something to do with the problem, as I had first started noticing the issue around the time I made that upgrade locally. However, as downgrading to 2.5.3 didn't fix the issue -- and others working on this app were running 2.6.3 with no issues -- I ended up concluding that the 2.6.3 upgrade did not seem to be the direct cause of the issue.
I'd very much like to understand what is actually causing this error in my environment. In the meantime, though, I'm very happy to finally have a viable workaround, so I can get work done again!
I currently have my primary work development computer, a 2017 MacBook Pro (15", with Touchbar), set up with a total of five monitors: The MacBook's own display, plus four external monitors.
Five monitors? Isn't that just a bit ridiculous?
Although it may seem like overkill, I have found that this setup is really good for productivity. I'm able to put my most-frequently-used windows each on their own monitor, which is great for avoiding time wasted switching different windows back and forth into the foreground.
It's also great for helping to minimize the situation of making a mental note of something in one window, switching to a different foreground window, and then doing something in that other window with the remembered information; I can just glance back and forth between multiple visible windows instead.
My typical window configuration with this setup:
- Second monitor from right: My primary monitor. Typically I've got a web browser here.
- Second monitor from left (portrait / vertical orientation): My code window. Typically my IDE / code editor (e.g. Visual Studio or RubyMine) goes here. Great for seeing tons of code at once! Also excellent for reviewing long documents, such as XSDs or other documentation.
- Leftmost monitor: Secondary browser or document window. I put terminal windows here. I also put my mini-mode iTunes music player in the corner.
- Rightmost monitor: Communication / chat. I typically have my team's Slack window open here.
- Top monitor: I keep a video conference window to my team's office in San Diego open here during the hours that they are working, so they can see and talk to me, and vice-versa!
What's the hardware?
Computer
MacBook Pro, 2017, 15".
As far as ports go, this computer has 4 USB-C ports, plus a 3.5mm headphone jack -- and that's it! Power, video, network -- everything is done through the USB-C ports.
I have the laptop sitting on a 3M LX500 Laptop Stand
to align its screen a little better vertically with the other
displays. I like this stand because there's a nice empty space under
the stand (which is the not the case with many stands), which is nice
for a little extra physical storage space on the desk top.
USB-C to 17-port adapter
OWC 13 Port Thunderbolt 3 Dock.
This is the main device that allows me to connect so many devices to my MacBook, including two of the four external monitors, as well as to provide power to the MacBook, all through a single one of the MacBook's USB-C ports.
Primary external monitor (second from right)
Dell U2312HM. 1920x1080 resolution.
Connected via: MacBook USB-C port → CableCreation brand USB-C to DVI adapter → DVI cable → Monitor DVI port
Portrait mode (vertical) monitor
Dell U2412M. 1920x1200 resolution.
Connected via: OWC Thunderbolt Dock → BlueRigger brand Mini Displayport to DVI cable → Monitor DVI port
The stand that comes with the monitor supports rotation, so it was very easy to get it set up in portrait mode.
The bump to 1200 resolution in the narrow dimension (instead of 1080) is nice, as it gives the monitor a little extra horizontal room in portrait mode.
Modern versions of MacOS and Windows both have excellent support for "rotating" the output for a given monitor to support portrait orientation -- I've successfully used this monitor in portrait orientation with both OS X and Windows.
Rightmost (tertiary, 4:3) monitor
Dell E196FP. 1280x1024 resolution.
Connected via: OWC Thunderbolt Dock → Agatha brand USB-C to VGA Cable → Monitor VGA port
I wouldn't actually recommend this specific model of monitor anymore, because it only supports a VGA cable connection! Newer connection types such as DVI, HDMI, or DisplayPort will generally provide a sharper screen image. However, even with just the VGA connection, in practice I don't notice any bothersome blurriness on this display.
Top monitor: Dell S2415H. 1920x1080 resolution with integrated speakers.
Connected via: MacBook USB-C port → Apple brand USB-C Digital AV Multiport Adapter → HDMI cable → Monitor HDMI port
Stand: WALI brand Extra Tall Universal Single LCD Monitor Fully Adjustable Desk Mount
How painful is docking / undocking?
It's not bad at all, actually; there are only 3 USB-C cables to plug or unplug when I connect or disconnect the MacBook laptop from the setup: The one USB-C cable for the OWC Thunderbolt Dock, plus the two additional monitor adapter dongles.
It's not quite as nice of an undock experience as when I used this same set of monitors and other devices with my Lenovo Windows laptop -- which involved unplugging just a single HDMI cable from the laptop itself, and removing the laptop from the physical dock -- but it's still very acceptable!
What's with all of the Dell brand monitors?
Experience has taught me that some non-Apple monitors just don't play nice with MacBooks. The typical symptom I've seen is that I'll connect a monitor to the MacBook, and simply nothing will happen: The Mac will act as though nothing new was connected. Even the System Preferences → Displays → (hold Option button) → Detect Displays feature wouldn't help.
I don't know of any reliable way to tell whether a particular non-Apple monitor is going to work with a Mac other than actually trying it.
I've had good luck with Dell monitors working with the MacBook, though, so my current plan is to continue going with the "Dell" strategy until something changes -- that is, until I run across a Dell monitor that doesn't work with the Mac!
So why the detailed write-up?
Actually getting this to work was the end result of a lot of trial and error. I tried several times connecting these and other monitors to the MacBook in ways that resulted in things not working -- almost always manifesting itself as the MacBook acting as though one or more of the connected external monitors didn't actually exist at all, as I noted earlier.
Some specific things that I remember trying when I was getting this all set up that didn't work:
- Trying to connect more than two external monitors via the OWC Thunderbolt dock. I was only ever able to get a maximum of two external monitors working through that dock; any further number of monitors I tried just wouldn't work.
- Certain other adapter and cable brands. In particular, whereas the CableCreation brand USB-C to DVI adapter (which has only 3.5 stars on Amazon as of this writing) worked for me, a similar Belinda brand USB-C to DVI adapter did not work for me -- even though it specifically listed support for MacBook -- and I ended up returning it.
- In general, I had a lot better luck getting "non-handshaking" port types (DVI, VGA) to work than "handshaking" ports (HDMI, DisplayPort). I had several different failures trying to get the two primary Dell monitors, both of which support both DisplayPort and DVI connections, to work with the MacBook via their DisplayPort connections, before I did get them working via their DVI ports. (Both Dell monitors did work just fine with my Lenovo Windows laptop via either one of their ports.)
Hopefully this post will prove of some value to anyone who might be trying to get a similar multi-monitor MacBook setup working; or to me, in the event that I need to try and recreate this setup in the future!
Wallpaper shout-outs
OS X does not currently have native support for spanning a single image across multiple monitors as the desktop wallpaper (like Windows does). The great $3 solution that I used to create the spanned image of the Enterprise-D as shown in the photo above is the Multi Monitor Wallpaper app, available on the MacOS App Store.
Multi Monitor Wallpaper shows you an outline of your combined monitor
layout, and allows you to stretch / zoom / reposition your selected
image across the monitors. It then automatically handles cutting up the image and setting it as the background image for each monitor. I have no affiliation with the app; I'm just a fan!
As for the excellent high-resolution image of the Enterprise-D itself, unfortunately I'm not sure whom to credit. I grabbed the image over a year ago via a Google image search, and I can't find the same image now when I search. If anyone knows where this image is from, let me know, and I'll gladly provide credit!
On the MacBook Pro (2017, with Touchbar) that I currently use as my primary development computer at work, after I "docked" the computer (reconnected all external monitors and devices) this morning, my monitors were in the wrong order.
Further, the display on one of the external monitors -- a Dell 2415H, connected via USB-C port → USB-C to HDMI adapter → HDMI cable → HDMI port -- had an extremely blurry display. That monitor also now had "overscan" of about a centimeter; that is, the image extended past the viewable area of the screen in all directions (so that I could only see the bottom edge of the menu bar at the top of the screen).
Fixing the display order was a simple matter of going into System Preferences → Displays → Arrangement, and dragging the monitors back into the proper order.
However, it took a little longer to figure out a solution to the blurriness issue. In the System Preferences → Displays window for the blurry monitor, the Resolution radio button was set to "Default for display" as usual. When I changed it to Scaled, the available values were "1080i" (selected), and 720p.
Changing the setting to 720p caused the display to be sharp again, but everything on that monitor ended up being sized way too large. (Plus, I then was only presumably getting 720 pixels of vertical resolution, instead of the 1920x1080 of which the monitor was capable.)
The solution turned out to be to close the Displays windows, unplug and replug that monitor's HDMI cable, and then open System Preferences → Displays again. After doing that, the Displays window → Color tab → Resolution (scaled) selection for the blurry monitor now displayed two additional options which weren't there before: "1080p" and "1600 x 900".
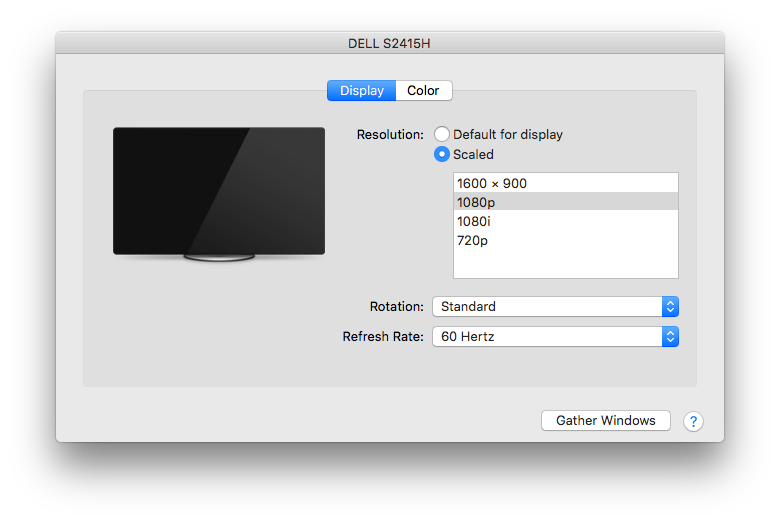
Changing the selection to the now-available "1080p" fixed the problem: All text and images on the monitor became nice and sharp again, and the overscan went away.
Sometime in mid-2013, I had a hankering to play a particular kind of RPG on my iPhone. I wanted a game with these features: - Turn-based combat.
- Portrait orientation, and thus playable with one hand. (e.g. while eating with the other hand.)
- A single protagonist/hero. One thing I don't like about party-based RPGs is that typically, a couple of your party members need be KO’ed before you feel like the team is actually in any real danger. This doesn't tend to happen against non-boss enemies in most games, and thus those games often end up feeling uninteresting for long stretches.
- Interesting decision-making in combat -- even vs. non-boss enemies -- something beyond the typical RPG trope of "do basic attacks / target enemy elemental weaknesses / heal self when injured / repeat."
- No hard-to-use on-screen virtual D-pad for character movement. Give me a way to move my character that’s designed especially for a touchscreen, not one based on a traditional physical controller’s tactile D-pad!
- A combat system built around LOW numbers and visible enemy HP / stats, so I can calculate that if, for example, that enemy has 9 HP left, then I can perfectly finish it off by doing my 4 and 5 HP attacks respectively over the next 2 rounds.
- FAST combat. No waiting on long combat animations; no wading through multiple menus to kick off a combat round. This is my phone; let me whip it out when I’ve got 30 seconds, and actually accomplish something quickly.
- No save points. Why not just always keep my game saved automatically? (Even mid-combat!)
- Game designed with a goal of fun, not of corporate revenue generation! Absolutely no IAPs or premium currencies or ads or stamina timers.
I couldn't find that game on the App Store. So... I decided to write it myself! After spending most of my evenings between 10:00pm and midnight (after my day job, spending time with my family, getting the kids into bed, and daily chores) for about 18 months designing and writing the game – learning the Objective-C programming language and the whole MacOS / iOS development ecosystem along the way – Vigil RPG was released in November 2014!  | Here’s Vigil RPG’s combat screen, which illustrates the realization a lot of the points noted above that I wanted to achieve with the game. You can check out more screen shots and info about the game at the Vigil RPG website! | Lifetime App Store Sales Stats I don't really have any reason to keep them private, and I thought it might be insightful for other #indiedev folks and industry observers, so without further ado, here are the lifetime sales statistics to date for Vigil RPG (iOS)! According to my developer account at iTunes Connect: 
- Released November 2014 at a price of US $2.99
- 354 paid copies sold, almost entirely at $2.99, with a few at $1.99 in a "birthday sale" in November 2015
- Total gross sales: US $1004
- About 70% of the lifetime sales of Vigil RPG came in the first 30 days after release.
- Vigil RPG got about ten 5-out-of-5-star community reviews on the App Store (and no 0-through-4-star reviews) immediately after release; it’s gotten zero community reviews since then. (Vigil RPG has no “review nag” prompts, which was an intentional design decision.)
- The second big spike in sales was after the 4-out-of-5-star TouchArcade review (which I was thrilled with, and found to be extremely on-point and fair – much respect to the reviewer, Shaun Musgrave). TouchArcade was the only major site to do a review.
- The little spike in November 2015 was the beginning of the $1.99 sale. Sales dropped off again rapidly even though I left the price at $1.99 for a while.
- Outside of the initial release and $1.99 sale periods, Vigil RPG sold at a rate of roughly 1 copy per week.
- Net proceeds after Apple's cut: US $707
- 3 x $US 99 of Apple annual developer licenses to develop the game and keep it live on the App Store = $297. Net proceeds after Apple dev license fees: $410
- Other misc. operating costs -- State of Michigan incorporation fees for Aggro Magnet Games LLC, web hosting for http://aggromagnetgames.com -- of around $100 to date. Bottom line proceeds to date: About $310
- 122 free copies redeemed (promo codes sent to review sites; a few free giveaways to try and drum up visibility and community interest)
- I didn’t bother trying to keep any stats on piracy rates, but at least one site out there (fairly readily findable via Google search) has the binary of the game posted for free download.
Given a very very rough estimate of about 600 hours spent creating the game, $310 in net profit works out to a wage of about $0.50/hour. Not exactly enough to quit the ol’ day job! (Fortunately, I already have a day job which I love!) I am, however, honestly totally fine with that performance. I made an intentional decision up front for my goal for the Vigil RPG project to be to "make the game I wanted to play" – with no design compromises being made for the sake of monetization. So no IAPs, no ads, no other typical "freemium" features (or “anti-features,” as the case may be) such as premium currencies or stamina timers. $0.99 Sale Consistent with my initial goal for Vigil RPG of prioritizing fun over profits, as of today, for the first time ever, the App Store price for Vigil RPG is reduced to $0.99! I’m hopeful that this will allow more people to enjoy the game – assuming there’s a segment of folks out there who are interested in iPhone RPGs, and are unwilling or unable to buy the game at the $2.99 price point, but will go ahead and pick it up for $0.99. The main reason I didn't just cut the price all the way down to $0.00 (free) was that admittedly there's somewhat more cachet in being able to say "The game I made is for sale on the App Store!" than "I made a game and I'm giving it away on the App Store since no one was really buying it!" It would also be nice if Vigil RPG’s proceeds would at least cover the annual $99 that Apple requires to keep it listed on the App Store. To that end, I might bump the price back to the original $2.99 at some point if sales at the $0.99 price point don’t generate much increased volume relative to the 1 sale/week or so of the $2.99 price. “Buy It Now!” Hopefully this detailed peek into one game’s iOS App Store performance was helpful, or at least mildly interesting! If you’d like read more about the gameplay of Vigil RPG, you can do so on the Vigil RPG website. Or, you can check out the full 5-to-10-hour adventure firsthand via Vigil RPG on the App Store if you’ve got an iOS device, and can scrape together enough loose change to join the exclusive club of premium iOS game owners! You can also hit me up with any questions you’ve got on Twitter at @AggroMagnetGame, or below in the comments!
Here’s a quick tip on selecting text with the mouse that I’m blogging as much to help myself remember as to inform you, the reader: You can double-click-drag – that is, double-click, and continue holding the mouse button on the 2nd click – to select multiple entire words from a block of text. This obviates the need to position the mouse cursor exactly over the small space between words when selecting entire words or sentences, both when beginning and ending the selection. Bonus tip: You can triple-click to select an entire line or paragraph of text. (This one I do remember and use frequently – and get annoyed by those few applications that don’t support it.) These tips work in most applications on both Windows and Mac.
What follows is something a little bit different: For your amusement, a somewhat steam-of-conciousness recounting of my first 60 minutes with a Mac Mini (purchased for the purpose of doing some on-the-side iOS development), from my background as a guy with 25+ years of DOS/Windows experience (dating back to doing BASIC development on an IBM PC my Dad brought home from work when I was 6 years old!) and some limited Unix/Linux experience, but no real Mac experience at all. Enjoy!
8:01 - Successfully booted up! Logitech mouse and "brand X" USB Windows keyboard (in use temporarily until next reboot, when I'll try my PS/2 IBM Model M keyboard with an adapter) appear to be working!
8:03 - Using Safari... the mouse scroll direction is backwards! I can't cope with that, Googling for a fix... okay, fixed it in System Preferences | Mouse.
8:06 - Some keyboard shortcuts use Win (Command)! Some still use Ctrl (Ctrl+Tab to switch browser tabs!) Confusing! A lot to learn!
8:11 - Keyboard document navigation is different!
- “Move one word at a time” now uses Alt (Option), not Ctrl!
- What’s the shortcut to jump to the beginning or end of a document?
8:14 - Middle-click doesn’t close tabs in Safari!
- Maybe I’ll switch to Firefox later. But going to stick out the “native experience” for now.
- Also, where are the favicons on the tabs? Hard to tell them apart.
8:17 - Ctrl+Tab doesn’t use MRU order in Safari!
- To be fair, no other browser gets this right either by default except Opera. Will be a deal-breaker though if it turns out that there’s no workaround, just like Chrome.
8:23 - Woah - Ctrl+LeftArrow takes me to some other desktop that shows a calendar and a calculator and some other stuff! (Hit that by accident trying to navigate within some text in an editor!)
8:27 - Looking through system preferences, Ctrl+UpArrow = Mission Control apparently! Seems like an interesting Alt+Tab (er, Cmd+Tab) alternative?
8:30 - Mouse button 4 (thumb button) doesn’t go Back in Safari! Is there a way to make that work?
8:32 - Some things are somewhat familiar from iPod Touch, e.g. Notifications Center and FaceTime.
8:35 - Safari seems bad at suppressing popup windows? Or maybe I’m just wandering into more “grey” parts of the Internet as I’m trying to look up things like keyboard shortcuts and haven’t learned yet which sites have good Mac info? But I've seen at least 2 spammy-looking popup windows show up in front of me so far.
8:37 - Thinking about security as I'm having to type in a couple of my passwords... How do I know that this Mac isn’t running a keylogger? What’s the equivalent of Ctrl+Shift+Esc on this thing? (Just tried that; it didn’t do anything, nor did Cmd+Shift+Esc, not that I really expected it to. Maybe a good old command-line ps -ef is the answer, like in Linux... will need to learn what's "normal" on this system and what's not.)
8:38 - Ok, so how do I open a Terminal window? Searching Google... Aha, Cmd+Space is kind of an analog to Win+R (or just the Win key as of Windows 7) on Windows. Then I can just type “terminal” and hit Enter.
8:41 - Where’s the filesystem explorer? I remember that it’s called “Finder” on Mac. Poking around... Ah, I see, it’s activated from the smiley mac face at the far left of the “applications bar” thingy at the bottom of the screen.
8:42 - The Close button is in the top-left of each window, not top-right. Is there an Alt+F4 (universal “close window” shortcut key) on this?
8:45 - Talking to my wife on her iPhone via “Messages!” Man, this thing works flawlessly, unlike any solution that I’ve tried on a PC to chat with her on her iPhone. User experience is just like my iPod Touch. Impressed, but at the same time disappointed at that lack of a good PC solution for me to use at work; real keys (PC) blow away virtual ones (iOS device) every time.
8:48 - The Home and End keys don’t work in the Messages message entry field, but they do work in other places like Google Docs running in Safari -- what’s that about? They don’t seem to work in the Safari address bar either?
8:50 - Thinking ahead to writing up all this as a blog post. Is there an equivalent to LiveWriter on Mac? I'll probably just use the Blogger web UI for starters.
8:52 - Oh, found by accident that Cmd+UpArrow/DownArrow is like Ctrl+Home/Ctrl+End. Was trying to do that Ctrl+UpArrow thing to activate Mission Control to find out where my terminal window went. Don’t see it... I must have closed it. But now I also see that Cmd+LeftArrow/RightArrow act like Home and End.
8:56 - What’s Launchpad do... ah, seems reminiscent of the iOS desktop. *All* of the icons!
8:58 - No Menu key? Is there a “right-click” key on Mac to bring up spelling fixes when the caret is on a misspelled word, without reaching for the mouse?
9:00 - Typing in a Safari textarea field and typoed in “cusotmer” and Safari is showing a little popup with the suggested corrected spelling “customer” -- great! But how do I accept that correction without reaching for the mouse and clicking on it? Just pressing space bar like on iOS doesn’t seem to do the trick? I can’t seem to use the tab key to get to the little popup either? ... Ah, I need to hit DownArrow and then enter, ok.
...And there you have it, the highlights of my first 60 minutes as a Mac user! Maybe I'll come back to this topic and do a "Mac Impressions - The First 60 Days" and give some more in-depth impressions once I've gotten to spend some significant time with this new machine.
Finally, here's one bonus thought to leave you with:
10:40 - I must have hit "Home" and/or "End" at least 15-20 times as I was editing this post, and in the process discovered that those keys on a Mac apparently serve to scroll the viewport (but not the insertion point, thankfully) to the beginning or end of a long editable text area, respectively! The muscle memory from all those years of DOS and Windows is baked in pretty hard. It will be interesting to see how difficult it is to overcome that as I continue using this new Mac... at least *some* of the time already I'm remembering to use Cmd+Left/Right instead of Home/End, but it's far from 100% at this early stage!
|
|


